一、什么是模板编译 模板编译有点类似于代码的编译器,主要用于将HTML解析成AST树,方便后续Vue对网页内容进行操作。
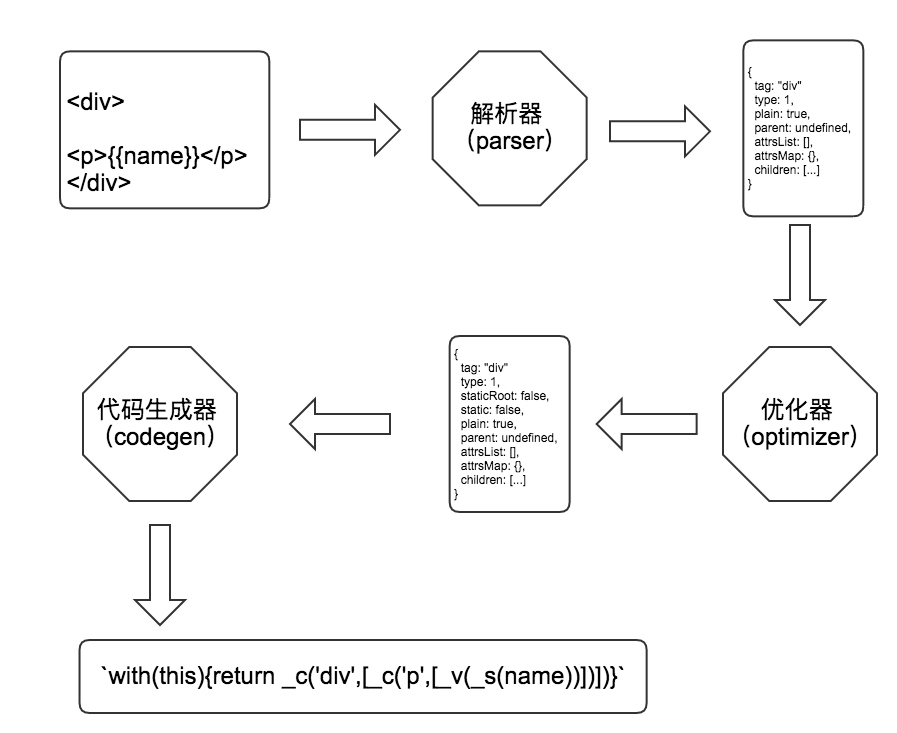
二、模板编译的架构 模板编译模块主要分为三个部分:parser(解析器)、optimizer(优化器)和code generator(代码生成器)
其中:parser(解析器) 用于解析HTML、模板变量和属性,最终生成AST树optimizer(优化器) 用于标记静态节点,被标记的静态节点不会参与重新渲染,达到优化性能的目的code generator(代码生成器) 会将AST树拼装成一段以“with(this)”开头的字符串,把它交给JS引擎执行就能生成对应的虚拟DOM
三、一切的开始 在src/platforms/web/runtime-with-compiler.ts 中调用了compileToFunctions进行模板编译,这是模板编译的入口。
// src/platforms/web/runtime -with-compiler .ts options .render = renderoptions .staticRenderFns = staticRenderFns
这里调用了函数compileToFunctions,其第一个参数是template,由options传入,也可以指定el,然后通过getOuterHTML来获得。
而这个compileToFunctions定义在:
1 2 // src/platforms/ web/compiler/i ndex.ts
可以看到compileToFunctions就是createCompiler的别名,其相关代码如下:
1 2 3 4 5 6 7 8 9 10 11 12 13 14 15 16 17 createCompilerCreator (function baseCompile (parse (template.trim (), options)if (options.optimize !== false) {optimize (ast, options)code = generate (ast, options)code .render ,code .staticRenderFns
在createCompiler中,先通过parse函数生成AST树,接着交给optimize进行优化,最后调用generate生成代码字符串。
四、解析器Parser
解析HTML1 2 3 4 5 6 7 8 9 10 11 12 13 14 15 16 17 18 19 20 21 22 23 24 25 26 function parse (....): ASTElement { ... let root parseHTML(template, { ..., // 处理解析开始标签返回的结果 start (...) { ... }, // 处理解析结束标签返回的结果 end (...) { ... }, // 处理解析文本内容返回的结果 chars (...) { ... }, // 处理注释返回的结果 comment (...) { ... } }) // 最终生成的AST 树 return root }
而这个parseHTML是用了jQuery的作者Johb Resig写的开源库:htmlparser.js 。
1 2 3 4 5 6 7 8 9 10 11 12 13 14 15 16 17 18 19 20 21 22 23 24 25 26 27 28 29 30 31 32 33 34 35 36 37 38 39 40 41 42 43 44 45 46 47 48 49 50 51 52 53 54 55 56 57 58 59 60 61 62 63 64 65 66 67 68 69 70 71 72 73 74 75 76 77 78 79 80 81 82 83 84 85 86 87 88 // src/compiler/ parser/html-parser.tsfunction parseHTML(html, options: HTMLParserOptions) {while (html) {// 排除script和style标签if (!lastTag || !isPlainTextElement(lastTag)) {// 匹配开始标签的尖括号'<' )if (textEnd === 0 ) {// 匹配并过滤注释if (comment.test(html)) {// 匹配并过滤条件注释if (conditionalComment.test(html)) {// 匹配并过滤Doctypeif (doctypeMatch) {// 匹配并处理结束标签if (endTagMatch) {0 ].length)1 ], curIdx, index)continue // 匹配并处理开始标签if (startTagMatch) {continue // 匹配文本内容next if (textEnd >= 0 ) {// 将textEnd之后的部分截取出来// 这一段逻辑用来处理文本内容中出现尖括号的情况while (// 第二个参数表示不匹配首字符// 因为将尖括号前面的部分slice掉,第一个字符必然是尖括号,所以这里的尖括号会匹配到结束标签的尖括号next = rest.indexOf('<' , 1 )if (next < 0 ) break next 0 , textEnd)// 如果匹配不到东西,说明这段html格式有问题,全部跳过if (textEnd < 0 ) {if (text) {if (options.chars && text) {// script/style标签单独处理else {
其中裁剪函数advance的代码如下:
1 2 3 4 5 6 7 // src/compiler/ parser/html-parser.tsfunction advance(n) {// index用于记录当前未处理的html字符位置// 截取功能是用substring实现的,返回的是序号n之后的字符串
而parseHTML这个函数主要做三件事情:处理开始标签、处理结束标签以及标签间的文本内容
1)首先看看代码是如何处理开始标签的
1 2 3 4 5 6 7 8 9 10 11 12 13 14 15 16 17 18 19 20 21 22 23 24 25 26 27 28 29 30 31 32 33 34 35 36 37 38 function parseStartTag() {= html.match (startTagOpen)if (start) {match : any = {: start[1],: [],: index0 ].length)let end , attrwhile (! (end = html.match (startTagClose) && = html.match (dynamicArgAttribute) || attr = html.match (attribute))= index0 ].length)end = indexmatch .attrs.push(attr)if (end ) {match .unarySlash = end [1 ]end [0 ].length)match .end = indexreturn match
匹配标签各部分内容是通过各种正则表达式来实现的,如startTagOpen的正则表达式就是:
1 2 3 const ncname = `[a-zA-Z_][\\-\\.0-9_a-zA-Z${unicodeRegExp.source} ]*` const qnameCapture = `((?:${ncname} \\:)?${ncname} )` const startTagOpen = new RegExp (`^<${qnameCapture} ` )
这个看起来有点晕,先把它简化一下,ncname中的unicode属于特殊情况,一般不会出现,所以可以改成:
1 const ncname = `[a-zA-Z_][\\-\\.0-9_a-zA-Z]*`
接着qnameCapture中的冒号:属于xml中才会出现的格式,是一种很古老的格式,现在一般html不会用到。所以startTagOpen最终可以简化成:
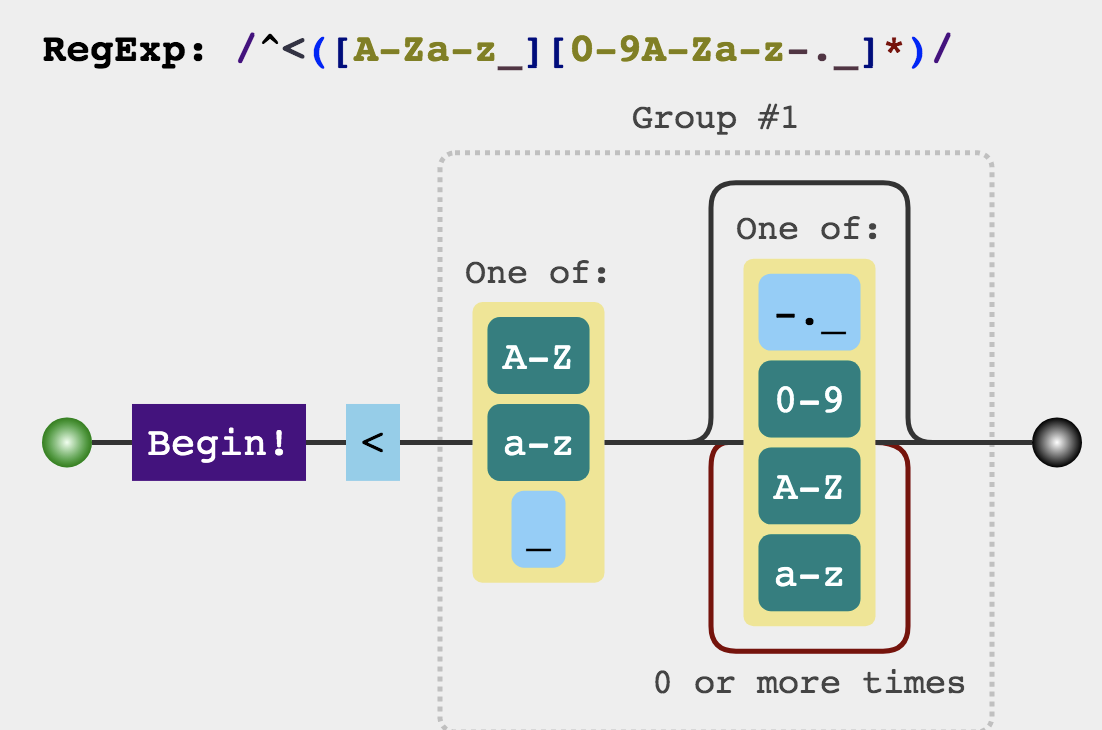
1 const startTagOpen = new RegExp(`^<([a -zA -Z_][\\-\\.0-9_a-zA -Z]* ) `)
最后我们可以借助正则表达式可视化工具 :
这里可以看到,这段正则其实就是匹配一个尖括号以及后面的标签,比如一段html代码像这样:
1 <div class ="main ">123 </div >
表达式匹配的就是
这部分
当匹配成功之后,代码就会建立一个match对象用来保存标签中的信息。
一种是普通的静态属性,对应的正则表达式是:
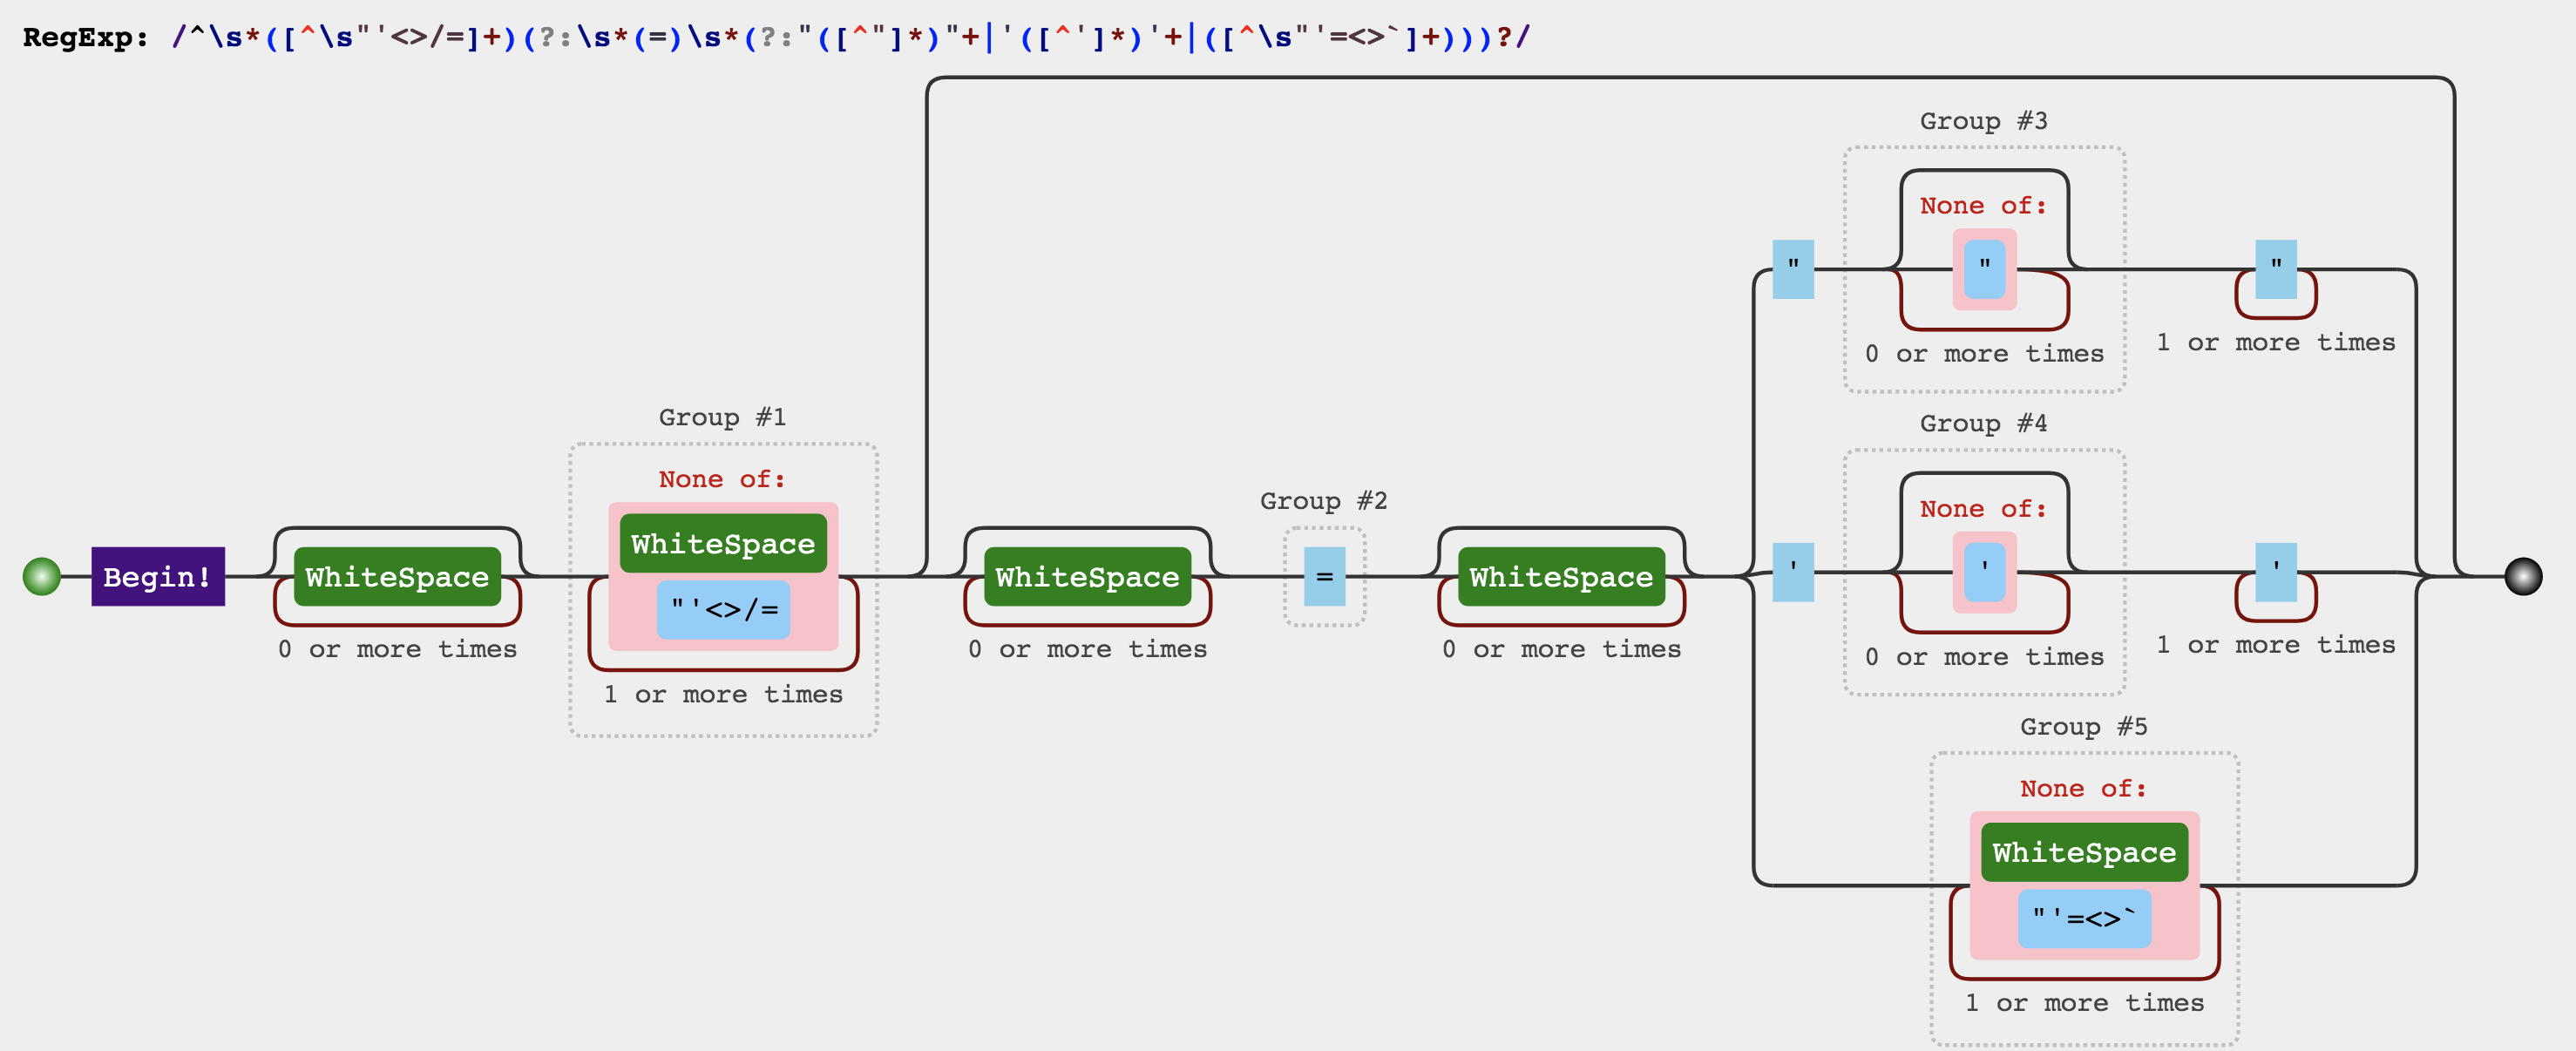
1 const attribute = /^\s*([^\s"'<>\/=]+)(?:\s*(=)\s*(?:" ([^"]*)" +|'([^' ]*)'+|([^\s"' =<>`]+)))?/
其可视化如下:
可以看出来这段正则的匹配逻辑就是 “空格+属性名+空格+等号+空格+属性值” 这样的形式,其中属性值并没有严格的格式规定,有可能是双引号、单引号,或者干脆啥都不加,所以表达式通过“|”分成三种情况来处理。
另一种则是动态属性,也就是Vue新增的v-bind、v-model、v-if、v-on这一类属性,其对应的正则表达式如下:
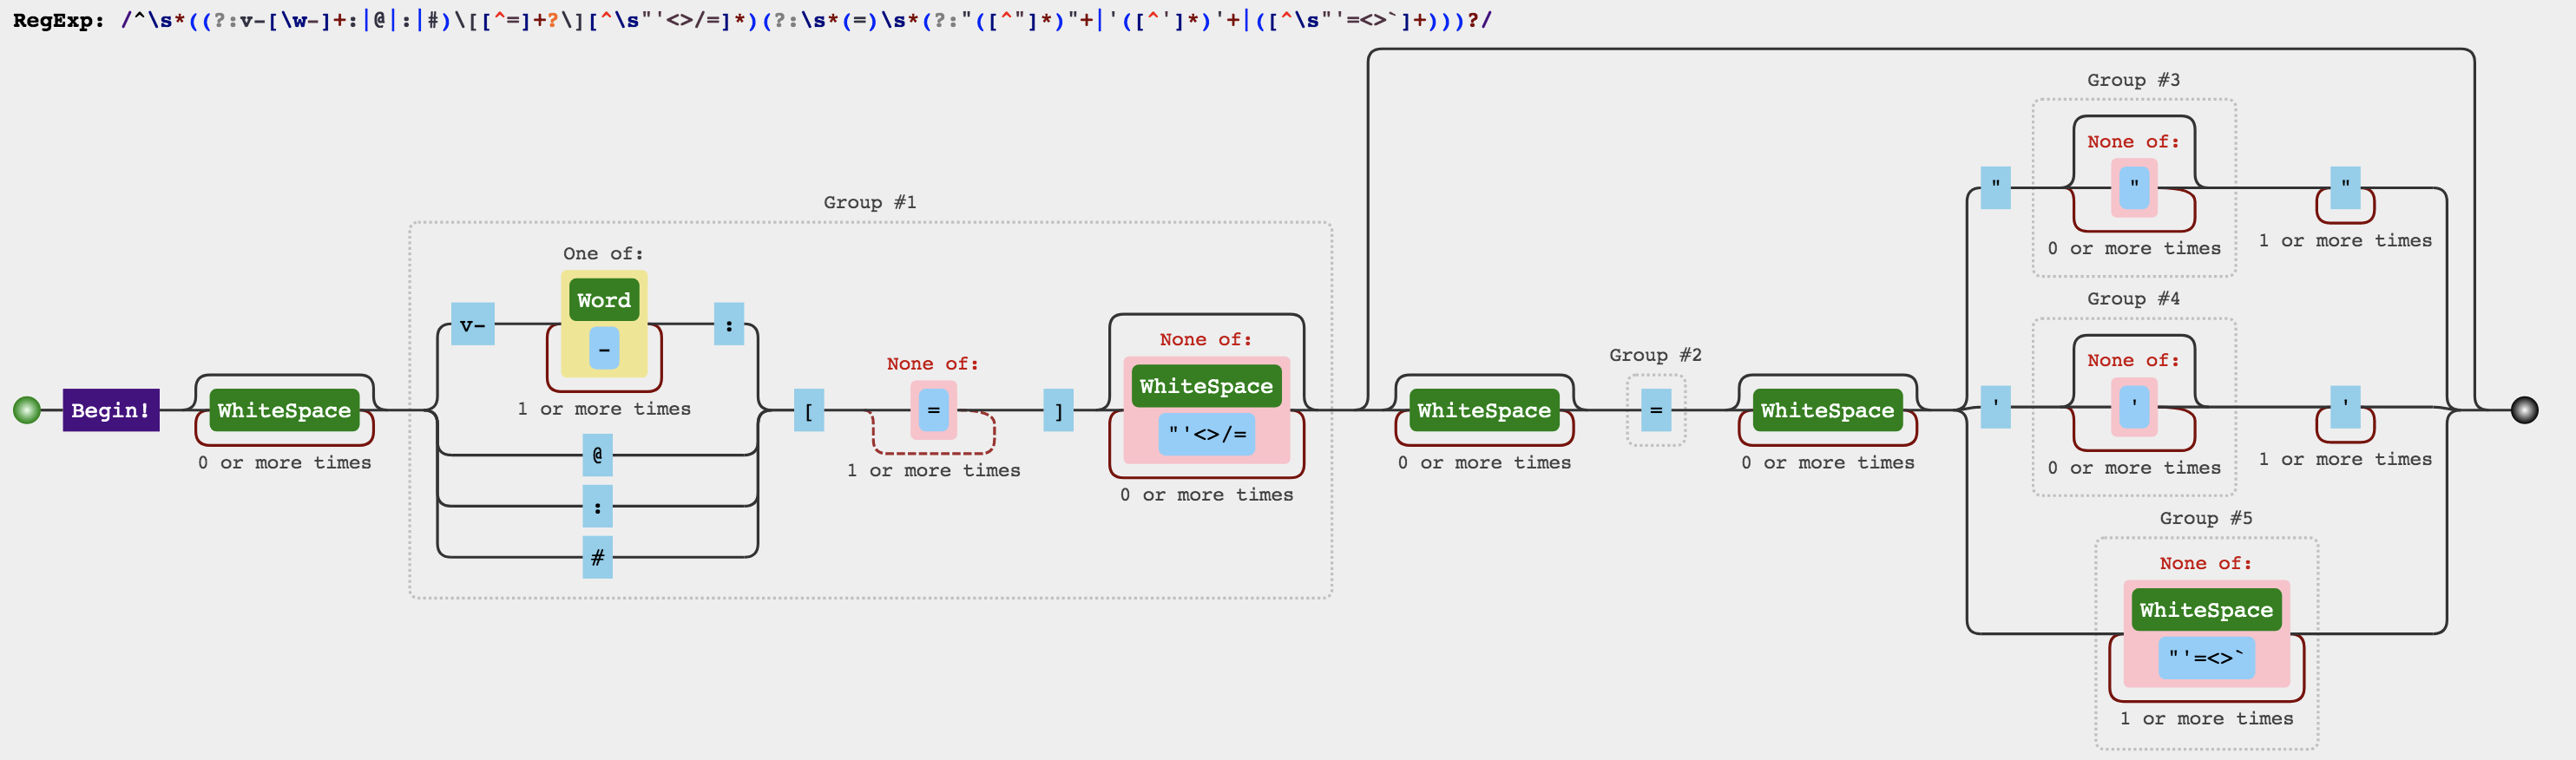
1 const dynamicArgAttribute = /^\s*((?:v-[\w-]+:|@|:|#)\[[^=]+?\][^\s"'<>\/=]*)(?:\s*(=)\s*(?:" ([^"]*)" +|'([^' ]*)'+|([^\s"' =<>`]+)))?/
通过可视化:
可以看出这个表达式其实就是在静态属性的基础上,增加了对属性名更细致化的匹配,会根据前缀v-、@、:、#来匹配动态属性。
最后是匹配开始标签的结束标志。
1 const startTagClose = /^\s*(\/?)>/
这一段正则表达式就很简单了,就是匹配多个空格加上一个或零个斜杠,再加上右尖括号
如果匹配到了,那就在match中新增一个属性unarySlash,保存end[1],也就是说end[1]有东西,那就说明这个标签是个自闭合标签。
handleStartTag的大致代码如下:
1 2 3 4 5 6 7 8 9 10 11 12 13 14 15 16 17 18 19 20 21 22 23 24 25 26 27 28 29 30 31 32 33 34 35 36 37 38 39 function handleStartTag(match ) {match .tagNamematch .unarySlash ... UnaryTag(tagName ) || !!unarySlashmatch .attrs.length[] = new Array(l ) for (let i = 0 ; i < l; i ++) {match .attrs[i ] [3 ] || args[4 ] || args[5 ] || '' ... attrs[i ] = {[1 ] ... }if (!unary) {to LowerCase() ,match .start,end : match .end if (options.start) {match .start, match .end )
从上面这段代码可以得知,handleStartTag主要做两件事情:
将属性转换成ASTAttr对象,再压入stack中
将结果返回给回调函数start
2)接着看看文本内容的处理逻辑
处理文本内容的大致代码如下:
1 2 3 4 5 6 7 8 9 10 11 12 13 14 15 16 17 18 19 20 21 22 23 24 25 26 27 28 29 30 31 32 33 34 35 36 // src/compiler/ parser/html-parser.ts// 匹配文本内容next if (textEnd >= 0 ) {// 将textEnd之后的部分截取出来// 这一段逻辑用来处理文本内容中出现尖括号的情况while (// 第二个参数表示不匹配首字符// 因为将尖括号前面的部分slice掉,第一个字符必然是尖括号,所以这里的尖括号会匹配到结束标签的尖括号next = rest.indexOf('<' , 1 )if (next < 0 ) break next 0 , textEnd)// 如果匹配不到东西,说明这段html格式有问题,全部跳过if (textEnd < 0 ) {if (text) {if (options.chars && text) {
在这段代码中,如果是普通的文本内容,直接通过html.substring(0, textEnd)截取即可。因为textEnd匹配的左尖括号刚好就是结束标签的左尖括号。
3)最后看看结束标签的处理
匹配结束标签的正则表达式跟开始标签差不多,就是多加了一道斜杠:
1 const endTag = new RegExp(`^<\\/ ([a -zA -Z_][\\-\\.0-9_a-zA -Z]* ) [^>] *>`)
接着将匹配到的标签名交给parseEndTag处理,大致代码:
1 2 3 4 5 6 7 8 9 10 11 12 13 14 15 16 17 18 19 20 21 22 23 24 25 26 27 28 29 30 31 32 33 34 function parseEndTag (tagName?: any, start?: any, end?: any) {lowerCasedTagName if (start == null) start = index if (end == null) end = index if (tagName) {toLowerCase ()for (pos = stack.length - 1 ; pos >= 0 ; post --) {if (stack[pos].lowerCasedTag === lowerCasedTagName) break else {0 if (pos >= 0 ) {for (let i = stack.length - 1 ; i >= pos; i --) {if (options.end) {end (stack[i].tag, start, end)1 ].tagelse {
转换成AST
跑完解析HTML逻辑之后,就要开始正式生成AST树。在parse中,通过向parseHTML传入回调函数start、end、chars来将stack转换成AST树,最后再将AST赋值给root,返回给外部使用。
1)start函数
在start函数中,主要做的事情就是创建一个ASTElement对象,解析动态属性,最后将ASTElement挂载到root下面。
1 2 3 4 5 6 7 8 9 10 11 12 13 14 15 16 17 18 19 20 21 22 23 24 25 26 27 28 29 30 31 32 33 34 35 36 37 38 39 40 41 42 43 44 45 46 let inVPre = false end ) { ... let element: ASTElement = createASTElement(tag , attrs , currentParent ) ... if (!inVPre) {Pre(element ) if (element.pre) {true ... if (inVPre) {RawAttrs(element ) else if (!element.processed){For(element ) If(element ) Once(element ) if (!root) { ... }if (!unary) {else {Element(element )
其中createASTElement的具体代码如下:
1 2 3 4 5 6 7 8 9 10 11 12 13 14 15 16 17 18 19 20 21 22 23 24 25 export function createASTElement ( tag: string , attrs: Array <ASTAttr>, parent: ASTElement | void return {type : 1 ,attrsList : attrs,attrsMap : makeAttrsMap (attrs),rawAttrsMap : {},children : []function makeAttrsMap (attrs: Array <Record<string , any >> ): Record <string , any > {const map = {}for (let i = 0 , l = attrs.length ; i < l; i ++) {name ] = attrs[i].value return map
这个ASTElement就是AST树的单一元素。
创建完ASTElement之后,就会判断是否是动态属性,这里会处理到的动态属性包括v-pre、v-for、v-if和v-once。
1 2 3 4 5 6 7 8 9 10 11 12 13 14 15 16 17 18 19 20 21 22 23 24 25 26 27 28 function processPre (el ) {if (getAndRemoveAttr (el, 'v-pre' ) != null ) {pre = true export function getAndRemoveAttr ( el: ASTElement, name: string , removeFromMap?: boolean string | undefined {let valif ((val = el.attrsMap [name]) != null ) {const list = el.attrsList for (let i = 0 , l = list.length ; i < l; i ++) {if (list[i].name === name) {splice (i, 1 )break if (removeFromMap) {delete el.attrsMap [name]return val
如果是inVPre为true,接下来的element就会交给函数processRawAttrs处理,具体代码如下:
1 2 3 4 5 6 7 8 9 10 11 12 13 14 15 16 17 18 19 20 21 // src/compiler/parser /index .tsfunction processRawAttrs(el) {if (len) {Array <ASTAttrs> = (el.attrs = new Array (len))for (let i = 0 ; i < len; i ++) {name : list[i].name,value : JSON .stringify(list[i].value )if (list[i].start != null ) {start end else if (!el.pre) {true
这段代码就是给element增加一个attrs属性,用来保存文本内容。
接着是处理动态属性中的v-for、v-if和v-once:
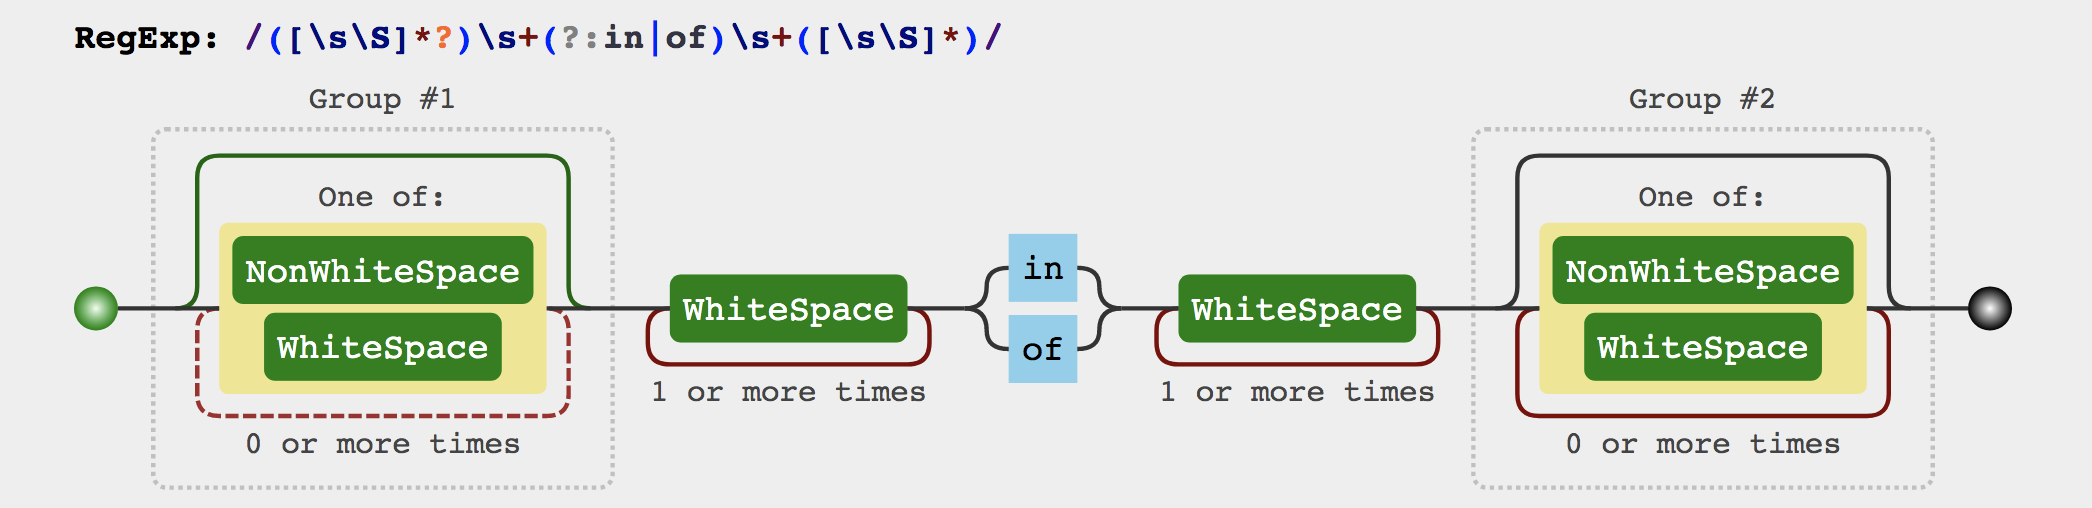
1 2 3 4 5 6 7 8 9 10 11 12 13 14 15 16 17 18 19 20 21 22 23 24 25 26 27 28 29 30 31 32 33 34 35 36 37 38 39 40 41 42 43 44 45 46 47 export const forAliasRE = /([\s\S]*?)\s+(?:in|of)\s+([\s\S]*)/ export const forIteratorRE = /,([^,\}\]]*)(?:,([^,\}\]]*))?$/ const stripParensRE = /^\(|\)$/g export function processFor (el: ASTElement ) {let expif ((exp = getAndRemoveAttr (el, 'v-for' ))) {const res = parseFor (exp)if (res) {extend (el, res)export function parseFor (exp: string ): ForParseResult | undefined {const inMatch = exp.match (forAliasRE)if (!inMatch) return const res : any = {}for = inMatch[2 ].trim ()const alias = inMatch[1 ].trim ().replace (stripParentRE, '' )const iteratorMatch = alias.match (forIteratorRE)if (iteratorMatch) {alias = alias.replace (forIteratorRE, '' ).trim ()iterator1 = iteratorMatch[1 ].trim ()if (iteratorMatch[2 ]) {iterator2 = iteratorMatch[2 ].trim ()else {alias = aliasreturn resexport function extend (to : Record <PropertyKey , any >,_from : Record <PropertyKey , any >Record <PropertyKey , any > {for (let key in _from) {return to
processFor函数的核心就是调用parseFor函数来解析for循环表达式
通过上图可以知道for表达式有in和of两种,前者取的是属性名,后者取的是属性值
这里将要进行循环的目标变量会被保存到res.for之中,而取出的变量会被保存到alias之中。
1 const stripParensRE = /^\(|\)$/g
将解构赋值表达式的左右括号给去掉
接着再通过正则表达式:
1 export const forIteratorRE = /,([^,\}\]]*)(?:,([^,\}\]]*))?$/
来匹配解构赋值中的第二个跟第三个变量,对,这里最多只匹配三个解构赋值变量,再多的变量就要考虑数组是不是存了太多东西了。
b.processIf函数
processIf用来处理v-if属性,具体代码如下:
1 2 3 4 5 6 7 8 9 10 11 12 13 14 15 16 17 18 19 20 21 22 23 24 25 26 27 28 function processIf (el) {exp = getAndRemoveAttr(el , 'v-if' )if (exp ) {el .if = exp if 对象el , {exp ,el else {if (getAndRemoveAttr(el , 'v-else' ) != null) {el .else = trueelseif = getAndRemoveAttr(el , 'v-else-if' )if (elseif ) {el .elseif = elseif function addIfCondition (el: ASTElement, condition: ASTIfCondition) {if (!el.ifConditions) {el .ifConditions = []el .ifConditions.push(condition)
条件动态属性有三种类型:v-if、v-else、v-elseif,其中v-if和v-elseif需要保存表达式,v-else只需要保存一个布尔值即可。
c.processOnce函数
具体代码如下:
1 2 3 4 5 6 function processOnce(el ) {AndRemoveAttr(el , 'v -once ') if (once != null) {true
这段就很简单了,就是检测v-once,然后设置once属性
最后如果是自闭合标签,就要调用closeElement函数来结束该element的处理,大致代码如下:
1 2 3 4 5 6 7 8 9 10 11 12 13 14 15 16 17 18 19 20 21 22 23 24 25 26 27 28 29 30 31 32 33 34 35 36 37 38 39 40 41 42 43 44 45 46 47 function closeElement (element ) trimEndingWhiteSpace (element)if (!inVPre && !element.processed) {processElement (element, options)if (!stack.length && element !== root) {if (root.if && (element.elseif || element.else )) {addIfCondition (root, {exp : element.elseif ,block : elementif (currentParent && !element.forbidden) {if (element.elseif || element.else ) {processIfConditions (element, currentParent)else {if (element.slotScope) {const name = element.slotTarget || '"default"' push (element)parent = currentParentfilter (c => !c.slotScope)trimEndingWhitespace (element)if (element.pre) {false if (platformIsPreTag (element.tag)) {false
这里面的核心是processElement函数,它会进一步处理element中的动态属性,大致代码如下:
1 2 3 4 5 6 7 8 9 10 11 12 13 14 15 16 export function processElement(element : ASTElement, options : CompilerOptions) {Key(element ) && !element.scopedSlots && !element.attrsList.lengthRef(element ) SlotContent(element ) SlotOutlet(element ) Component(element ) ... processAttrs(element )
其中processKey用来处理属性名为key的绑定属性,这个属性会在diff算法中用到。具体代码如下:
1 2 3 4 5 6 7 8 9 10 11 12 13 14 15 16 17 18 19 function processKey (el ) const exp = getBindingAttr (el, 'key' )if (exp) {function getBindingAttr ( el: ASTElement, name: string , getStatic?: boolean string | undefined const dynamicValue = getAndRemoveAttr (el, ':' + name) || getAndRemoveAttr (el, 'v-bind:' + name)if (dynamicValue !== null ) {return parseFilters (dynamicValue)
其中getBindingAttr函数就是获取以v-bind开头的动态属性。
processRef用来处理ref属性,具体代码如下:
1 2 3 4 5 6 7 8 9 10 11 12 13 14 15 16 17 18 19 function processRef(el ) {ref = getBindingAttr(el , 'ref ') if (ref ) {ref = ref InFor(el ) function checkInFor(el : ASTElement) : boolean {let parent: ASTElement | void = el while (parent) { if (parent.for !== undefined) { return true } parent = parent.parent } return false }
因为for循环会创建出来多个相同的节点,当然相同的ref也会有多个,所以需要增加一个refInFor来标识这个状态。
processSlotContent和processSlotOutlet用来处理模板变量template。
1 2 3 4 5 6 7 8 9 10 11 12 13 14 15 16 17 18 19 20 21 22 23 24 25 26 27 28 29 30 31 32 33 34 35 36 37 38 39 40 41 42 43 44 45 46 47 48 49 50 51 52 53 54 55 56 57 58 59 60 61 62 63 64 65 66 67 68 69 70 71 72 73 74 75 76 77 78 79 80 81 82 83 84 85 86 87 88 89 90 91 92 93 export const emptySlotScopeToken = `_empty_` const slotRE = /^v-slot(:|$)|^#/ const dynamicArgRE = /^\[.*\]$/ function processSlotContent (el ) {let slotScopeif (el.tag === 'template' ) {getAndRemoveAttr (el, 'scope' )slotScope = slotScope || getAndRemoveAttr (el, 'slot-scope' )else if (slotScope == getAndRemoveAttr (el, 'slot-scope' )) {slotScope = slotScopeconst slotTarget = getBindingAttr (el, 'slot' )if (slotTarget) {slotTarget = slotTarget === '""' ? 'default' : slotTarget slotTargetDynamic = !!(el.attrsMap [':slot' ] || el.attrsMap ['v-bind:slot' ])if (el.tag !== 'template' && !el.slotScope ) {addAttr (el, 'slot' , slotTarget, getRawBindingAttr (el, 'slot' ))if (process.env .NEW_SLOT_SYNTAX ) {if (el.tag === 'template' ) {const slotBinding = getAndRemoveAttrByRegex (el, slotRE)if (slotBinding) {const { name, dynamic } = getSlotName (slotBinding)slotTarget = nameslotTargetDynamic = dynamicslotScope = slotBinding.value || emptySlotScopeTokenelse {const slotBinding = getAndRemoveAttrByRegex (el, slotRE)if (slotBinding) {const slots = el.scopedSlots || (el.scopedSlots = {})const { name, dynamic } = getSlotName (slotBinding)const slotContainer = (slots[name] = createASTElement ('template' ,slotTarget = nameslotTargetDynamic = dynamicchildren = el.children .filter ((c: any ) => {if (!c.slotTarget ) {parent = slotContainerreturn true slotScope = slotBinding.value || emptySlotScopeTokenchildren = []plain = false function getSlotName (binding ) {let name = binding.name .replace (slotRE, '' )if (!name) {if (binding.name [0 ] !== '#' ) {'default' return dynamicArgRE.test (name)name : name.slice (1 , -1 ), dynamic : true }name : `"${name} "` , dynamic : true }export function getAndRemoveAttrByRegex (el: ASTElement, name: RegExp ) {const list = el.attrsList for (let i = 0 , l = list.length ; i < l; i ++) {const attr = list[i]if (name.test (attr.name )) {splice (i, 1 )return attr
刚看到这段代码有点迷糊,这里面会专门处理slot-scope这个从来没见过的属性。
processSlotOutlet函数处理的是内部组件的slot占位符,其代码如下:
1 2 3 4 5 6 function processSlotOutlet (el) {if (el .tag === 'slot' ) {el .slotName = getBindingAttr(el , 'name' )
这个函数就很简单了,仅仅是判断一下标签名,然后新增一个slotName用来保存插槽的名称
processComponent用于处理is属性,具体代码如下:
1 2 3 4 5 6 7 function processComponent(el ) {let bindingif ((binding = getBindingAttr(el , 'is ') )) { ...
is属性允许在data中定义对应的变量,修改该变量可以快速切换Component
最后的processAttrs用于处理v-model、v-bind等等剩余,具体代码如下:
1 2 3 4 5 6 7 8 9 10 11 12 13 14 15 16 17 18 19 20 21 22 23 24 25 26 27 28 29 30 31 32 33 34 35 36 37 38 39 40 41 42 43 44 45 46 47 48 49 50 51 52 53 54 55 56 57 58 59 60 61 62 63 64 65 66 67 68 69 70 71 72 73 74 75 76 77 78 79 80 81 82 83 84 85 86 87 88 89 90 91 92 93 94 95 96 97 98 99 100 101 102 103 104 105 106 107 108 109 110 111 112 113 114 115 116 117 118 119 120 121 122 123 124 125 126 127 128 129 130 131 132 133 134 135 136 137 138 139 140 141 142 143 144 145 146 147 148 149 150 151 152 153 154 155 156 157 158 159 160 161 162 163 164 165 166 167 168 169 170 171 172 173 174 175 176 177 178 179 180 181 182 183 184 185 186 187 188 189 190 191 192 193 194 195 196 197 198 199 200 201 202 203 204 205 206 207 208 209 210 211 212 213 214 215 216 217 218 219 220 221 222 223 224 225 226 227 228 229 230 231 232 233 234 235 236 237 238 239 240 241 242 243 244 245 246 247 248 249 250 251 252 253 254 255 256 257 258 259 260 261 262 263 264 265 266 267 268 269 270 271 272 273 274 275 276 277 278 279 280 281 282 283 284 function processAttrs (el ) {const list = el.attrsList let i, l, name, rawName, value, modifiers, syncGen, isDynamicfor (i = 0 , l = list.length ; i < l; i ++) {name value if (dirRE.test (name)) {hasBinding = true parseModifiers (name.replace (dirRE, '' ))if (process.env .VBIND_PROP_SHORTHAND && propBindRE.test (name)) {prop = true `.` + name.slice (1 ).replace (modifierRE, '' )else if (modifiers) {replace (modifierRE, '' )if (bindRE.test (name)) {replace (bindRE, '' )parseFilters (value)test (name)if (isDynamic) {slice (1 , -1 )if (modifiers) {if (modifiers.prop && !isDynamic) {camelize (name)if (name == 'innerHTML' ) name = 'innerHTML' if (modifiers.camel && !isDynamic) {camelize (name)if (modifiers.sync ) {genAssignmentCode (value, '$event' )if (!isDynamic) {addHandler (`update:${camelize(name)} ` ,null ,false ,if (hyphenate (name) !== camelize (name)) {addHandler (`update:${hyphenate(name)} ` ,null , false ,else {addHandler (`"update:"+(${name} )` ,null ,false ,true if (prop ) ||component && platformMustUseProp (el.tag , el.attrsMap .type , name))addProp (el, name, value, list[i], isDynamic)else {addAttr (el, name, value, list[i], isDynamic)else if (onRE.test (name)) {replace (onRE, '' )test (name)if (isDynamic) {slice (1 , -1 )addHandler (el, name, value, modifiers, false , warn, list[i], isDynamic)else {replace (dirRE, '' )const argMatch = name.match (argRE)let arg = argMatch && argMatch[1 ]false if (arg) {slice (0 , -(arg.length + 1 ))if (dynamicArgRE.test (arg)) {slice (1 , -1 )true addDirective (else {addAttr (el, name, JSON .stringify (value), list[i])if (component &&'muted' &&platformMustUseProp (el.tag , el.attrsMap .type , name)addProp (el, name, 'true' , list[i])const camelizeRE = /-(\w)/g export const camlize = cached ((str : string ): string =>return str.replace (camelizeRE, (_, c ) => (c ? c.toUpperCase () : '' ))export function cached<R>(fn : (str: string ) => R): (str: string ) => R {const cache : Record <string , R> = Object .create (null )return function cachedFn (str: string ) {const hit = cache[str]return hit || (cache[str] = fn[str])export function addHandler ( el: ASTElement, name: string , value: string , modifiers?: ASTModifiers | null , important?: boolean , warn?: Function , range?: Range, dynamic?: boolean if (modifiers.right ) {if (dynamic) {`(${name} )==='click'?'contextmenu':(${name} )` else if (name === 'click' ) {'contextmenu' delete modifiers.right else if (modifiers.middle ) {if (dynamic) {`(${name} ) === 'click' ? 'mouseup' : (${name} )` else if (name === 'click' ) {'mouseup' if (modifiers.capture ) {delete modifiers.capture prependModifierMarker ('!' , name, dynamic)if (modifiers.once ) {delete modifiers.once prependModifierMarker ('~' , name, dynamic)if (modifiers.passive ) {delete modifiers.passive prependModifierMarker ('&' , name, dynamic)let eventif (modifiers.native ) {delete modifiers.native nativeEvents || (el.nativeEvents = {})else {events || (el.events = {})const newHandler : any = rangeSetItem ({ value : value.trim (), dynamic }, range)if (modifiers !== emptyObject) {modifiers = modifiersconst handlers = events[name]if (Array .isArray (handlers)) {unshift (newHandler) : handlers.push (newHandler)else if (handlers) {else {plain = false export function addProp ( el: ASTElement, name: string , value: string , range?: Range, dynamic?: boolean props || (el.props = [])).push (rangeSetItem ({ name, value, dynamic }, range)plain = false export function addAttr ( el: ASTElement, name: string , value: any , range?: Range, dynamic?: boolean const attrs = dynamicdynamicAttrs || (el.dynamicAttrs = [])attrs || (el.attrs = [])push (rangeSetItem ({ name, value, dynamic }, range))plain = false export functio addDirective ( el: ASTElement, name: string , rawNama: string , value: string , arg?: string , isDynamicArg?: boolean , modifiers?: ASTModifiers, range?: Range directives || (el.directives = [])).push (rangeSetItem (plain = false
这里的cached利用闭包函数的特性,将计算出来的结果保存在内存中,下次取用的时候直接返回结果,无需重复计算,估计computed也是这么实现的。
2)chars函数
chars函数主要做的事情就是解析节点中的文本内容,文本内容分为两种,
1 2 3 4 5 6 7 8 9 10 11 12 13 14 15 16 17 18 19 20 21 22 23 24 25 26 27 28 29 30 31 32 33 34 35 36 37 38 39 40 41 42 43 44 45 46 47 48 49 50 51 52 53 54 55 56 57 58 59 60 61 62 63 64 65 66 67 68 69 70 71 72 73 74 75 76 77 78 79 80 81 82 83 84 85 86 87 88 89 90 91 92 93 94 95 96 97 98 99 100 101 102 103 104 105 106 107 108 109 110 111 112 113 114 115 116 117 118 119 120 121 const lineBreakRE = /[\r\n]/ /[ \f\t\r\n]+/g text : string, start?: number , end?: number ) {if ('textarea' &&text return if (inPre || text .trim ()) {text = isTextTag(currentParent)text text ) as string)else if (!children.length ) {text = '' else if (whiteSpaceOption) {if (whiteSpaceOption === 'condense' ) {text = lineBreakRE.test(text )? '' : ' ' else {text = ' ' else {text = preserveWhitespace ? ' ' : '' if (text ) {if (!inPre && whitespaceOption === 'condense' ) {text = text .replace (whitespaceRE, ' ' )undefined if (!inVPre && text !== ' ' && (res = parseText(text , delimiters))) {2 ,tokens : res.tokens,text else if (text !== ' ' ||length ||length - 1 ].text !== ' ' 3 ,text if (child) {push (child)function isTextTag (el ): boolean {return el.tag === 'script' || el.tag === 'style' /\{\{((?:.|\r?\n)+?)\}\}/g function parseText ( text: string, delimiters?: [string, string] TextParserResult | void {if (!tagRE.test(text )) {return any [] = []0 )while ((match = tagRE.exec(text ))) {if (index > lastIndex) {push ((tokenValue = text .slice (lastIndex, index)))push (JSON.stringify(tokenValue))exp = parseFilters(match[1 ].trim ())push (`_s(${exp } )` )push ({ '@binding' : exp })0 ].length if (lastIndex < text .length ) {push ((tokenValue = text .slice (lastIndex)))push (JSON.stringify(tokenValue))return {expression : tokens.join('+' ),tokens : rawTokens/[-.*+?^${}()|[\]\/\\]/g delimiters =>0 ].replace (regexEscapeRE, '\\$&' )1 ].replace (regexEscapeRE, '\\$&' )return new RegExp(open + '((?:.|\\n)+?)' + close, 'g' )
为了区分模板变量跟普通文本,代码使用了parseText函数。
循环结束之后,再处理下模板变量后的文本内容,返回结果给res
3)end函数
end函数用于做节点的最终处理,大致代码如下:
1 2 3 4 5 6 7 end (tag, start, end) {const element = stack[stack.length - 1 ]1 1 ]closeElement (element)
获取最后一个元素,将最后一个元素交给closeElement处理
五、优化器Optimizer Optimizer的作用就是标记静态节点,被标记的节点不会参与渲染,这样将会很好的节省性能。
1 2 3 4 5 6 7 8 9 10 11 12 13 14 15 16 17 18 19 20 21 22 23 24 25 26 27 28 29 30 31 32 33 34 35 36 37 38 39 40 41 42 43 44 45 46 47 48 49 50 51 52 53 54 55 56 57 58 59 60 61 62 63 64 65 66 67 68 69 70 71 72 73 74 75 76 77 78 79 80 81 82 83 84 85 86 87 88 89 90 91 92 93 94 95 96 97 98 99 100 101 102 103 104 105 106 107 108 109 110 111 112 113 114 115 116 117 118 119 120 121 122 123 124 125 126 127 128 129 130 131 132 133 134 export function optimize ( root: ASTElement | null | undefined , options: CompilerOptions ) if (!root) return '' )false )function genStaticKeys (keys: string ) : Function return makeMap('type,tag,attrsList,attrsMap,plain,parent,children,attrs,start,end,rawAttrsMap' + ',' + keys : '' )const genStaticKeysCached = cached(genStaticKeys)function markStatic (node: ASTNode) static = isStatic(node)if (node.type === 1 ) {if ('slot' &&'inline-template' ] == null return for (let i = 0 , l = node.children.length; i < l; i ++) {const child = node.children[i]if (!child.static ) {static = false if (node.ifConditions) {for (let i = 0 , l = node.ifCondition.length; i < l; i ++) {const block = node.ifCondition[i].blockif (!block.static ) {static = false function markStaticRoots (node: ASTNode, isInFor: boolean ) if (node.type === 1 ) {if (node.static || node.once) {if (static &&1 && node.children[0 ].type === 3 )true return else {false if (node.children) {for (let i = 0 , l = node.children.length; i < l; i ++) {for )if (node.ifConditions) {for (let i = 0 , l = node.ifConditions.length; i < l; i ++) {function isStatic (node: ASTNode) : boolean if (node.type === 2 ) {return false if (node.type === 3 ) {return true return !!(if && for && const isBuildInTag = makeMap('slot,component' , true )const isReservedAttribute = makeMap('key,ref,slot,slot-scope,is' )function isDirectChildOfTemplateFor (node: ASTElement) : boolean while (node.parent) {if (node.tag !== 'template' ) {return false if (node.for ) {return true return false
从上面代码可以看到,标记节点主要标记两类节点,第一类是普通静态节点,第二类是静态根节点
从根节点开始,取它的子节点进行遍历,接着递归子节点的子节点,直到不再有子节点。
静态根节点的标记也是差不多的逻辑,其判断条件是:
六、代码生成器Code generator Code generator主要用来生成代码字符串,这段代码字符串将在后续丢给JS引擎执行,生成虚拟DOM。
具体逻辑如下:
1 2 3 4 5 6 7 8 9 10 11 12 13 14 15 16 17 18 19 20 21 22 export type CodegenResult = {string ,string >export function generate (void ,const state = new CodegenState(options)const code = ast.tag === 'script'null '"div" )'return {with (this ){return ${code}}`,.staticRenderFns
generate函数的核心就是genElement函数,用来生成最终的代码字符串。
1 2 3 4 5 6 7 8 9 10 11 12 13 14 15 16 17 18 19 20 21 22 23 24 25 26 27 28 29 30 31 32 33 34 35 36 37 38 39 40 41 42 43 44 45 46 47 48 49 50 51 52 53 54 55 56 57 58 59 60 export function genElement (el: ASTElement, state: CodegenState ): string {if (el.parent ) {pre = el.pre || el.parent .pre if (el.staticRoot && !el.staticProcessed ) {return genStatic (el, state)else if (el.once && !el.onceProcessed ) {return genOnce (el, state)else if (el.for && !el.forProcessed ) {return genFor (el, state)else if (el.if && !el.ifProcessed ) {return genIf (el, state)else if (el.tag === 'template' && !el.slotTarget && !state.pre ) {return genChildren (el, state) || 'void 0' else if (el.tag === 'slot' ) {return genSlot (el, state)else {let codeif (el.component ) {genComponent (el.component , el, state)else {let dataconst maybeComponent = state.maybeComponent (el)if (!el.plain || (el.pre && maybeComponent)) {genData (el, state)let tag : string | undefined const bindings = state.options .bindings if (maybeComponent && bindings && bindings.__isScriptSetup !== false ) {checkBindingType (bindings, el.tag )if (!tag) tag = `'${el.tag} '` const children = el.inlineTemplate ? null : genChildren (el, state, true )`_c(${tag} ${ data ? `,${data} ` : '' } ${ children ? `,${children} ` : '' } )`return code
其中最主要的函数包括genChildren、genData、genText,
1 <p title ="Sherwood" @click ="c" >1</p>
生成的节点格式大致如此:
1 2 3 4 5 6 7 8 9 10 with (this ) {return _c ('p' ,'title' : 'Sherwood' },on : {'click' : c}_v('1') ]
以下是各种生成字符串函数的代码:
1 2 3 4 5 6 7 8 9 10 11 12 13 14 15 16 17 18 19 20 21 22 23 24 25 26 27 28 29 30 31 32 33 34 35 36 37 38 39 40 41 42 43 44 45 46 47 48 49 50 51 52 53 54 55 56 57 58 59 60 61 62 63 64 65 66 67 68 69 70 71 72 73 74 75 76 77 78 79 80 81 82 83 84 85 86 87 88 89 90 91 92 93 94 95 96 97 98 99 100 101 102 103 104 105 106 107 108 109 110 111 112 113 114 export function genData (el: ASTElement, state: CodegenState ): string {let data = '{' const dirs = genDirectives (el, state)if (dirs) data += dirs + ',' if (el.key ) {`key:${el.key} ,` if (el.ref ) {`key:${el.ref} ,` if (el.refInFor ) {`refInFor:true,` if (el.pre ) {`pre:true,` if (el.component ) {`tag:"${el.tag} ",` for (let i = 0 ; i < state.dataGenFns .length ; i ++) {dataGenFns [i](el)if (el.attrs ) {`attrs:${genProps(el.attrs)} ,` if (el.props ) {`domProps:${genProps(el.props)} ,` if (el.events ) {`${genHandlers(el.events, false )} ,` if (el.nativeEvents ) {`${genHandlers(el.nativeEvents, true )} ,` if (el.slotTarget && !el.slotScope ) {`slot:${el.slotTarget} ,` if (el.scopedSlots ) {`${genScopedSlots(el, el.scopedSlots, state)} ,` if (el.model ) {`model:{value:${el.model.value} ,callback:${el.model.callback} ,expression:${el.model.expression} },` if (el.inlineTemplate ) {const inlineTemplate = genInlineTemplate (el, state)if (inlineTemplate) {`${inlineTemplate} ,` replace (/,$/ , '' ) + '}' if (el.dynamicAttrs ) {`_b(${data} ,"${el.tag} ",${genProps(el.dynamicAttrs)} )` if (el.wrapData ) {wrapData (data)if (el.wrapListeners ) {wrapListeners (data)return dataexport function genChildren ( el: ASTElement, state: CodegenState, checkSkip?: boolean , altGenElement?: Function , altGenNode?: Function string | void {const children = el.children return `[${children.map(c => genNode(c, [state])).join(',' )} ]` ...export function genNode (node: ASTNode, state: CodegenState ): string {if (node.type === 1 ) {return genElement (node, state)else if (node.type === 3 && node.isComment ) {return genComment (node)else {return genText (node)export function genText (text: ASTText | ASTExpression ): string {return `_v(${ text.type === 2 ? text.expression : transformSpecialNewlines(JSON .stringify(text.text)) } )`
在genData中,会生成各种属性相关的对象字符串。src/core/instance/render-helpers/index.ts ,具体代码如下:
1 2 3 4 5 6 7 8 9 10 11 12 13 14 15 16 17 18 19 20 _o = markOnce_n = toNumber_s = toString _l = renderList_t = renderSlot_q = looseEqual_i = looseIndex_m = renderStatic_f = resolveFilter_k = checkKeyCodes_b = bindObjectProps_v = createTextNode_e = createEmptyVNode_u = resolveScopedSlots_g = bindObjectListeners_d = bindDynamicKeys_p = prependModifier
其中常用的有用于创建文本节点的_v,用于创建空节点的_e。_c ,用于创建节点,定义在src/core/instance/render.ts ,具体代码如下:
1 2 _c(a , b , c , d ) => createElement(vm , a , b , c , d , false )
七、总结 通过以上对源码的解析,已经完全了解模板编译的整个过程。
现在大致总结一下模板编译的核心要点:
通过parse函数生成AST树,通过optimize函数标记静态节点,通过generate函数生成代码字符串
在parse函数中调用了parseHTML来解析HTML
parseHTML将会借助正则表达式来分别匹配开始标签、文本内容以及结束标签。
这里的开始标签匹配到之后,会push到stack中,之后在处理结束标签的时候,找到开始标签并出栈
在处理开始标签、文本标签和结束标签时,最终会将结果返回给回调函数start、chars、end
在回调函数中会将节点转换成ASTElement,最后生成AST树,返回给外部
生成AST树之后,就交给optimize进行优化。
optimize会标记所有AST树静态节点,接着标记所有静态根节点
标记完成之后,会将AST树交给generate生成代码字符串
这些代码字符串会被保存在render函数中
当监听器Watcher监听到数据变化,就会调用render函数生成虚拟节点,然后通过对比新旧虚拟节点之间的区别,将最新的变化应用到真实DOM上面去
参考
Vue的模板编译原理 Vue 模板编译原理 Vue源码 如何看待Vue.js 2.0 的模板编译使用了with(this)的语法? Vue中的cached函数 with文档