什么是路由
在普通的html页面中,可以通过以下代码实现锚点功能:
1
2
3
4
5
6
7
8
9
10
11
12
13
14
15
16
17
18
19
20
21
22
23
24
25
26
27
28
29
30
31
32
33
34
35
36
37
38
39
40
41
42
43
44
45
46
47
48
49
50
51
52
53
54
55
56
57
58
59
60
61
62
63
64
65
| <style>
.box {
height: 800px;
}
#b1 {
background-color: red;
}
#b2 {
background-color: green;
}
#b3 {
background-color: orange;
}
#b4 {
background-color: skyblue;
}
.side-bar {
postion: fixed;
top: 0;
right: 0;
background: white;
}
</style>
<div class="side-bar">
<a href="#b1">b1</a>
<a href="#b2">b2</a>
<a href="#b3">b3</a>
<a href="#b4">b4</a>
</div>
<div class="box" id="b1"></div>
<div class="box" id="b2"></div>
<div class="box" id="b3"></div>
<div class="box" id="b4"></div>
|
而在SPA(单页面应用)中,通过锚点来切换页面的功能便是路由。其中锚点也称作Hash地址。
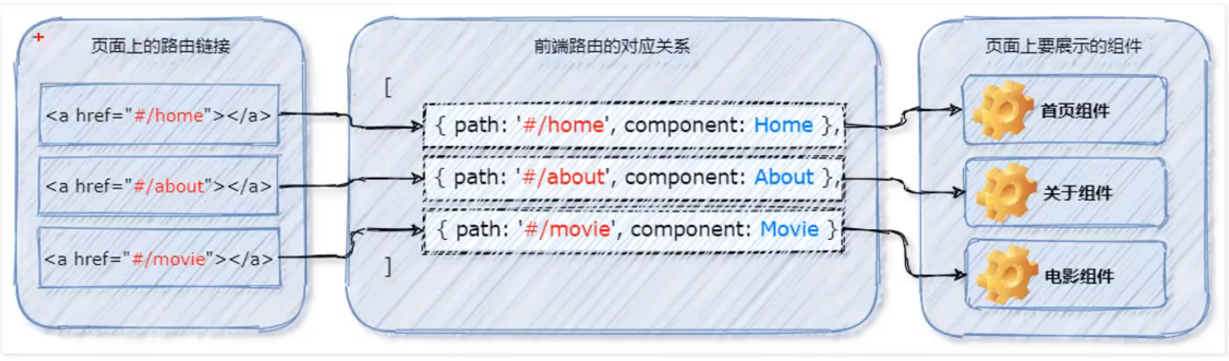
前端路由的工作方式
用户点击了页面上的路由链接
导致URL地址栏中的Hash地址变化
前端路由监听到Hash地址的变化
前端路由将当前Hash地址对应的组件渲染到浏览器中
路由的模拟实现
在主页面中定义三个锚点
1
2
3
4
5
| <a href="#/home">Home</a>
<a href="#/content">Content</a>
<a href="#/about">About</a>
|
再定义一个动态组件
1
| <component :is="comName"></component>
|
接着在script部分添加数据comName
1
2
3
4
5
6
7
8
9
| data() {
return {
comName: "Home"
}
}
|
最后要监听到Hash地址的变化,就需要在创建vue组件的时候注册onhashchange事件,在事件中修改comName。
1
2
3
4
5
6
7
8
9
10
11
12
13
14
15
16
17
18
19
20
21
22
23
24
25
26
27
28
29
| created() {
window.onhashchange = () => {
switch(location.hash) {
case "#/home":
this.comName = "Home";
break;
case "#/content":
this.comName = "Content";
break;
case "#/about":
this.comName = "About";
break;
}
};
}
|
这样就实现了一个简易的路由功能。
安装配置路由
- 安装vue-router包
npm i vue-router -S
- 创建路由模块
在src源代码目录下,创建router/index.js路由模块,并初始化如下代码:
1
2
3
4
5
6
7
8
9
10
11
12
13
14
15
16
17
|
import Vue from 'vue';
import VueRouter from 'vue-router';
Vue.use(VueRouter);
const router = new VueRouter();
export default router
|
- 导入并挂载路由模块
在main.js中引入router,并将它挂在Vue上面
1
2
3
4
5
6
7
8
9
| import router from '@/router/index.js';
new Vue({
render: h => h(App),
router: router
}).$mount("#app");
|
注意:可以直接引入整个文件夹@/router,这样系统会默认找到router文件夹下面的index.js
1
| import router from '@/router'
|
- 声明路由链接和占位符
首先在App.vue中声明一个router-view用于占位,一会页面会渲染到这个地方:
1
| <router-view></router-view>
|
接着在index.js中添加路由的对应关系
1
2
3
4
5
6
7
8
9
10
11
12
13
14
15
16
17
18
19
| import Home from '@/components/Home.vue';
import Content from '@/components/Content.vue';
import About from '@/components/About.vue';
const router = new VueRouter({
routes: [
{ path: '/home', compoent: 'Home' },
{ path: '/content, compoent: 'Content' },
{ path: '/about, compoent: 'About' },
]
})
|
此时的path无需加#号,系统默认会给加上。
这样就实现了一个简单的路由功能。
- 使用router-link替代a链接
router-link是官方推荐的一种路由a链接写法,可以省略掉#号,直接写路径
1
2
3
4
5
| <router-link to="/home">首页</router-link>
<router-link to="/content">内容</router-link>
<router-link to="/about">关于</router-link>
|
- redirect重定向默认路径
在没有特别指定的情况下,直接访问网址的根路径,会看到一张空白页面,正常的做法是访问根路径,直接跳转到Home组件。为了实现这一功能,就是用到redirect重定向功能。用法很简单,直接在VueRouter实例中添加一行
1
| { path: '/', redirect: '/home' },
|
嵌套路由
想要在子组件中添加新的子页面,就需要用到嵌套路由。
首先在About.vue中声明路由链接和占位符
1
2
3
4
5
6
7
| <router-link to="/about/tab1">tab1</router-link>
<router-link to="/about/tab2">tab2</router-link>
<hr/>
<router-view></router-view>
|
在components文件夹中增加tabs文件夹,实现Tab1和Tab2两个组件
1
2
3
4
5
6
7
8
9
10
11
12
13
14
15
16
17
18
19
20
21
| <template>
<div class="tab-container">
<h3>Tab1组件</h3>
</div>
</template>
<style lang="less" scoped>
tab-container {
background-color: "tomato";
min-height: 200px;
}
</style>
|
在router文件夹中的index.js添加children属性来关联路由
1
2
3
4
5
6
7
8
9
10
11
12
13
14
15
16
17
18
19
20
21
22
23
24
25
26
27
28
29
30
31
32
33
| import Tab1 from "@/components/tabs/Tab1.vue";
import Tab2 from "@/components/tabs/Tab2.vue";
const router = new VueRouter({
routes: [
...
{
path: "/about",
component: About,
redirect: "/about/tab1",
children: [
{ path: "tab1", component: Tab1 },
{ path: "tab2", component: Tab2 }
]
}
...
]
})
|
注意:children中的path路径前面不需要加斜杠。
除了使用redirect来制定默认子路由,还可以直接制定tab1的path为/about
先把router-link中的tab1页面直接指定/about链接
1
| <router-link to="/about">tab1</router-link>
|
接着把index.js中的tab1链接指定为空的
1
2
3
4
5
6
7
8
9
10
11
| path: "/about",
component: "About",
children: [
{ path: "", component: Tab1 },
{ path: "tab2", component: Tab2 }
]
|
动态路由
如果有一堆电影链接如movie/1,movie/2,movie/3,这时想要用一条路由规则来匹配所有链接,就需要用到动态路由。动态路由的使用很简单,就是冒号加变量名即可,它会自动匹配movie/后面的内容
首先在vue组件中定义链接:
1
2
3
4
5
| <router-link to="/movie/1">《疾速追杀》</router-link>
<router-link to="/movie/2">《基督山伯爵》</router-link>
<router-link to="/movie/3">《我不是药神》</router-link>
|
在index.js中添加:mid变量
1
| { path: "/movie/:mid", component: Movie }
|
这个时候vue会在自个的route属性中注册一个mid变量,如果想要访问mid,可以通过以下方式
Movie 组件 ---------
不过这种访问方式比较麻烦,可以通过开启props开启参数传递
首先在路由中开启props
1
| { path: "/movie/:mid", component: Movie, props: true }
|
然后在vue组件中的js代码部分声明接受变量:
1
2
3
4
5
6
7
8
9
10
11
| <script>
export default {
name: "Movie",
props: ["mid"]
}
</script>
|
最后就可以直接使用该变量了
1
| <h3>Movie组件 ------ {{ mid }}</h3>
|
参考:
Vue2.0-01.路由概念 -
了解前端路由的概念
Vue2.0-02.路由概念 -
前端路由的工作方式
Vue2.0-03.路由的基本用法 -
手动模拟简单的前端路由
Vue2.0-04.路由的基本用法 -
安装和配置路由
Vue2.0-05.路由的基本用法 -
小注意点
Vue2.0-06.路由的基本用法 -
在路由模块中声明路由的对应关系
Vue2.0-07.路由的基本用法 -
使用router-link替代a链接
Vue2.0-08.路由的基本用法 -
redirect重定向
Vue2.0-09.嵌套路由 -
声明子路由链接和占位符
Vue2.0-10.嵌套路由 -
声明嵌套路由规则
Vue2.0-11.嵌套路由 -
默认子路由
Vue2.0-12.动态路由 -
基本用法
Vue2.0-13.动态路由 -
为路由规则开启props传参