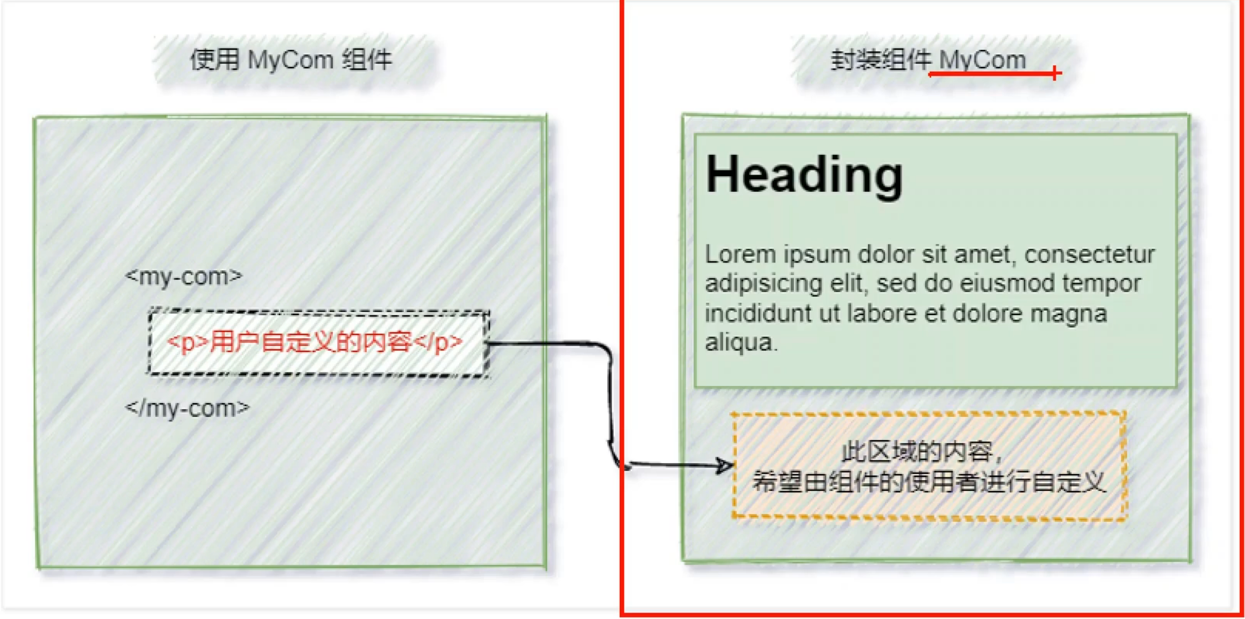
什么是插槽
插槽(Slot)是vue为组件的封装者提供的能力。允许开发者在封装组件时,把不确定的、希望由用户指定的部分定义为插槽。
示例代码
Left.vue
1
2
3
4
5
6
7
8
9
10
11
12
13
14
15
16
17
18
19
20
21
22
23
24
25
26
27
28
29
30
31
32
33
34
35
36
37
38
39
40
41
42
43
44
45
46
47
48
49
50
51
52
53
54
55
56
57
58
59
60
61
62
63
64
| <template>
<div class="left-container">
<h3>Left组件</h3>
<hr>
<slot>
<h6>这是slot的默认内容,如果有替换的内容,这一条会被替换掉</h6>
</slot>
</div>
</template>
<script>
export default {}
</script>
<style lang="less">
.left-container {
padding: 0 20px 20px;
background-color: orange;
min-height: 250px;
flex: 1;
}
</style>
**Main.vue**
<template>
<div class="app-container">
<h1>App 根组件</h1>
<hr/>
<div class="box">
<Left>
<p>这是在Left组件的内容区域,声明的p标签</p> //
如果想在Left中插入p标签,就需要在Left中插入Slot
</Left>
</div>
</div>
</template>
|
name属性
vue官方规定:每一个slot插槽,都要有一个name属性。
如果省略这个name属性,那么它的值就是defalut。
1
| <slot name="default"></slot>
|
默认情况下,插入的内容会自动替代值为defalut的插槽。
即
1
2
3
4
5
6
| <Left>
<p>这是在Left组件的内容区域,声明的p标签</p> //
如果想在Left中插入p标签,就需要在Left中插入Slot
</Left>
|
中的p会自动替换掉
具名插槽v-slot
如果想要指定特定标签渲染特定的slot,就要用到v-slot属性。
但是v-slot不能直接放到标签上
1
| <p v-slot:default>这是在Left组件的内容区域,声明的p标签</p>
|
这样会报错:
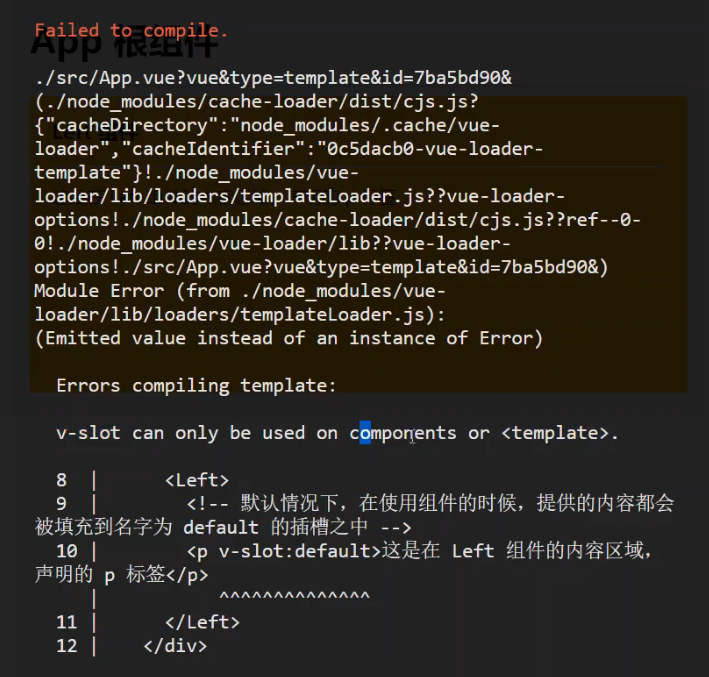
报错说明v-slot只能用在template之中。
像下面这样:
1
2
3
4
5
| <template v-slot:default>
<p>这是在Left组件的内容区域,声明的p标签</p>
</template>
|
其中v-slot可以简写成#,就像下面这样:
1
2
3
4
5
| <template #defalut>
<p>这是在Left组件的内容区域,声明的p标签</p>
</template>
|
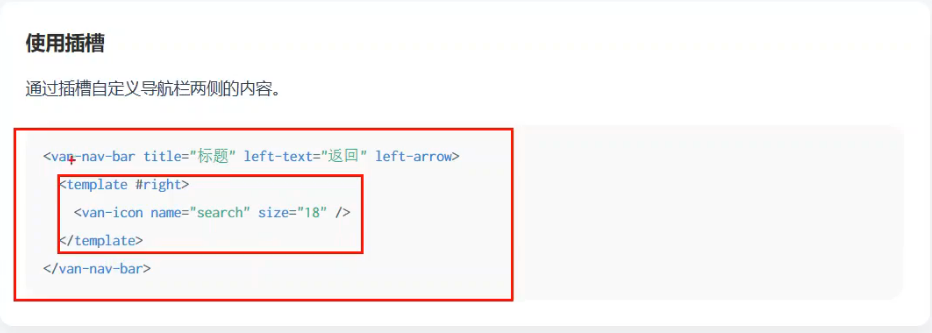
具名插槽实例
常用的组件库Vant就常需要插槽来定义自定义内容:
另外,我们也可以定一个Article.vue,在Article.vue中加入各种slot
1
2
3
4
5
6
7
8
9
10
11
12
13
14
15
16
17
18
19
20
21
22
23
24
25
26
27
28
29
30
31
32
33
34
35
36
37
38
39
40
41
42
43
44
45
46
47
48
49
50
51
52
53
54
55
56
57
58
59
60
61
62
63
64
65
66
67
68
69
70
71
72
73
74
75
76
77
78
79
| <template>
<div class="article-container">
<div class="header-box">
<slot name="header">
<div>默认头部</div>
</slot>
</div>
<div class="content-box">
<slot name="content">
<div>默认内容</div>
</slot>
</div>
<div class="footer-box">
<slot name="footer">
<div>默认尾部</div>
</slot>
</div>
</div>
</template>
<script>
export default {
name: "Article"
}
</script>
<style lang="less" scoped>
.article-container {
> div {
min-height: 150px;
}
.header-box {
background-color: pink;
}
.content-box {
background-color: lightblue;
}
.footer-box {
background-color: lightsalmon;
}
}
</style>
|
然后在App.vue中实现slot
1
2
3
4
5
6
7
8
9
| <template>
<div id="app">
<Article>
<template #header>
<div>
|
这是头部
1
2
3
4
5
6
7
| </div>
</template>
<template
<div>
|
这是内容
1
2
3
4
5
6
7
| </div>
</template>
<template
<div>
|
这是尾部
1
2
3
4
5
6
7
8
9
10
11
12
13
14
15
16
17
18
19
20
21
22
23
24
25
26
27
28
29
30
31
| </div>
</template>
</Article>
</div>
</template>
<script>
import Article from '@/components/Article.vue'
export default {
name: 'App',
components: {
Article
}
}
</script>
<style lang="less">
</style>
|
作用域插槽
在封装组件时,为预留的提供属性对应的值,这种用法,就叫做”作用域插槽”。
1
| <slot name="content" msg="hello vue.js"></slot>
|
需要使用时,就在主vue中赋值为scope,这个scope中就包含了上面定义的msg
1
2
3
4
5
| <template #content="scope">
<div>{{ scope.msg }}</div>
</template>
|
解构赋值
我们可以在data中定义用户的相关信息
1
2
3
4
5
6
7
8
9
10
11
12
13
14
15
16
17
18
19
20
21
22
23
24
25
| <script>
export default {
name: "Article",
data() {
return {
userinfo: {
name: "zs",
age: 20
}
}
}
}
</script>
|
然后在插槽中定义一个属性user,将数据动态绑定到该属性上面
1
2
| <slot name="content" msg="hello vue.js"
:user="userinfo"></slot>
|
最后打印scope
1
2
3
4
5
6
7
8
9
| <template #content="scope">
<div>
<p> {{ scope }} </p>
</div>
</template>
|
就会发现相关数据:

当然也可以直接访问到scope内的值
1
| <p> {{ scope.user }} </p>
|
或者将scope直接替换成解构的值
1
2
3
4
5
6
7
8
9
| <template #content="{ msg, user }">
<div>
<p>{{ user.name }}</p>
</div>
</template>
|
改造购物车
本次的主要改造点是把Goods组件中的Counter组件提出来,替换成slot。
首先注释掉eventBus的相关代码,将Counter引入App.vue中:
1
2
3
4
5
6
7
8
9
10
11
| import Counter from '@/components/Counter.vue'
export defalut {
components: {
Counter
}
}
|
在Goods组件中添加slot
1
2
3
4
5
6
7
8
9
10
11
12
13
| <div class="goods-info">
<div class="goods-title"></div>
<div class="goods-info-bottom">
<div class="goods-price"></div>
<slot></slot>
</div>
</div>
|
在Good中渲染Counter
1
2
3
4
5
| <Goods ...>
<Counter></Counter>
</Goods>
|
接着将物品的数量传入到Counter中
1
| <Counter :num="item.goods_count"></Counter>
|
再然后要让Counter组件中的加号和减号修改的数值能够通知到外层的item,就要给它们绑定事件
1
2
3
4
5
6
7
8
9
10
11
| add() {
this.$emit("num-change", ++this.count);
}
sub() {
this.$emit("num-change", --this.count);
}
|
此时在外部传给这个事件一个item,接着用$event接收内部传出的数据,便可以直接修改item中的goods_count
1
2
| <Counter :num="item.goods_count" @num-change="getNewNum(item,
$event)"></Counter>
|
最后实现getNewNum函数即可:
参考:
Vue2.0-07.插槽 -
了解插槽的基本用法
Vue2.0-08.插槽 -
v-slot指令
Vue2.0-09.插槽 -
v-slot的简写形式以及插槽的后备内容
Vue2.0-10.插槽 -
具名插槽的定义和使用
Vue2.0-11.插槽 -
作用域插槽的基本用法
Vue2.0-12.插槽 -
作用域插槽的解构赋值
Vue2.0-13.插槽 - 基于slot插槽改造购物车案例 -
1
Vue2.0-14.插槽 - 基于slot插槽改造购物车案例 -
2
Vue2.0-15.插槽 - 基于slot插槽改造购物车案例 -
3