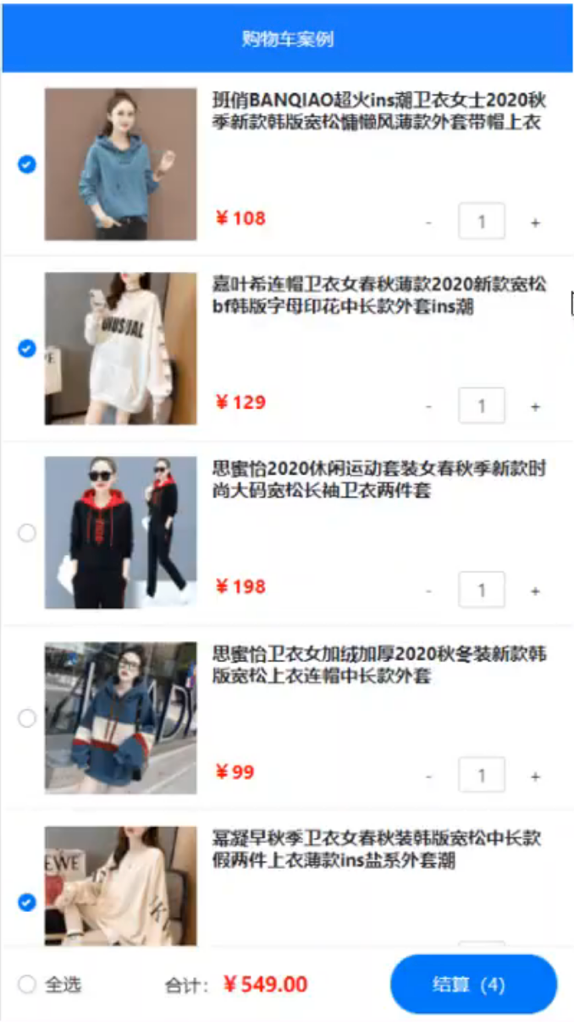
2-14-购物车案例

一、案例效果

二、头部组件Header

1
2
3
4
5
6
7
8
9
10
11
12
13
14
15
16
17
18
19
20
21
22
23
24
25
26
27
28
29
30
31
32
33
34
35
36
37
38
39
40
41
42
43
44
45
46
47
48
49
50
51
52
53
54
55
56
57
58
59
60
61
62
63
<template>

<div class="header-container">

{{ title }}

</div>

</template>

<script>

export default {

props: {

title: {

default: "",

type: String

}

}

}

</script>

<style lang="less" scoped>

.header-container {

width: 100%;

top: 0;

position: fixed;

background-color: #1d7bff;

text-align: center;

font-weight: bold;

font-size: 14px;

height: 50px;

z-index: 999;

color: #fff;

display: flex;

justify-content: center;

align-items: center;

}

</style>

注意点:

  • 想要头部组件固定在屏幕顶部,就必须设置position为fixed,并且top为0

  • 需要子组件垂直居中,就需要做如下设置:

1
2
3
4
5
display: flex;

justify-content: center;

align-items: center;

三、商品组件Goods

1
2
3
4
5
6
7
8
9
10
11
12
13
14
15
16
17
18
19
20
21
22
23
24
25
26
27
28
29
30
31
32
33
34
35
36
37
38
39
40
41
42
43
44
45
46
47
48
49
50
51
52
53
54
55
56
57
58
59
60
61
62
63
64
65
66
67
68
69
70
71
72
73
74
75
76
77
78
79
80
81
82
83
84
85
86
87
88
89
90
91
92
93
94
95
96
97
98
99
100
101
102
103
104
105
106
107
108
109
110
111
112
113
114
115
116
117
118
119
120
121
122
123
124
125
126
127
128
129
130
131
132
133
134
135
136
137
138
139
140
141
142
143
144
145
146
147
148
149
150
151
152
153
154
155
156
157
158
159
160
161
162
163
164
165
166
167
168
169
170
171
172
173
174
175
176
177
178
179
180
181
182
183
184
185
186
187
188
189
190
191
192
193
194
<template>

<div class="goods-container">

<div class="thumb">

<div class="custom-control custom-checkbox">

<input type="checkbox" class="custom-control-input" :id="'cb' +
id" :checked="state" @change="stateChange">

<label class="custom-control-label" :for="'cb' + id">

<img :src="pic" alt="">

</label>

</div>

</div>

<div class="goods-info">

<div class="goods-title">{{ title }}</div>

<div class="goods-info-bottom">

<span class="goods-price">¥ {{ price.toFixed(2) }}</span>

<Counter :num="count" :id="id"></Counter>

</div>

</div>

</div>

</template>

<script>

import Counter from '@/components/Counter.vue'

export default {

props: {

id: {

required: true,

type: Number

},

pic: {

default: '',

type: String

},

title: {

default: '',

type: String

},

price: {

default: 0,

type: Number

},

state: {

default: true,

type: Boolean

},

count: {

defalut: 1,

type: Number

}

},

methods: {

stateChange(e) {

this.$emit('state-change', { id: this.id, state: e.target.checked });

}

},

components: {

Counter

}

}

</script>

<style lang="less" scoped>

.goods-container {

+ .goods-container {

border-top: 1px solid #efefef;

}

display: flex;

padding: 10px;

.thumb {

display: flex;

align-items: center;

img {

width: 100px;

height: 100px;

margin: 0 10px;

}

}

.goods-info {

display: flex;

flex-direction: column;

justify-content: space-between;

flex: 1;

.goods-title {

font-size: 12px;

font-weight: bold;

}

.goods-info-bottom {

display: flex;

justify-content: space-between;

.goods-price {

display: flex;

align-items: flex-end;

color: red;

font-size: 18px;

font-weight: bold;

}

}

}

}

</style>

注意点:

  1. 勾选框元素增加id属性,id接收传入的id参数,label元素的for属性保持跟勾选框的id属性一致,保证点击label能够勾选。

  2. 勾选状态、图片、标题、价格、物品数量都是从外部接收数据,因此在props中定义了相关属性。

  3. 为了让组件的职责更明确,这里传入了所以细节数据,而不是直接传一个item。

  4. 当勾选商品时,需要将勾选状态往外更新到主数据,这里就要用到$emit

this.$emit(‘state-change’, { id: this.id, state: e.target.checked });

    • .goods-container
      中的加号代表选择相邻元素,这里的作用是让除第一个元素之外的其他元素起效果。
  1. space-between会让首尾两个元素贴着边缘,其他元素依序排列。

  2. 给flex设置成1, 意即flex-basis:0% flex-grow:1
    flex-shrink:1。因为flex-basis为0,所以空间优先分配给相邻元素,剩余的空间再分配给自己,又由于flex-grow为1,所以该元素将占满整个剩余空间,不留一丝缝隙。

四、商品数量组件Counter

1
2
3
4
5
6
7
8
9
10
11
12
13
14
15
16
17
18
19
20
21
22
23
24
25
26
27
28
29
30
31
32
33
34
35
36
37
38
39
40
41
42
43
44
45
46
47
48
49
50
51
52
53
54
55
56
57
58
59
60
61
62
63
64
65
66
67
68
69
70
71
72
73
74
75
76
77
78
79
80
81
82
83
84
85
86
87
88
89
90
91
92
93
94
95
96
97
98
99
100
101
102
103
104
105
106
107
108
109
110
111
112
113
114
115
116
117
118
119
120
121
122
<template>

<div class="number-container">

<button type="button" class="btn btn-light btn-sm"
@click="sub">-</button>

<input type="text" class="number-box" v-model="count"
@blur="changeCount"/>

<button type="button" class="btn btn-light btn-sm"
@click="add">+</button>

</div>

</template>

<script>

import bus from '@/components/eventBus.js'

export default {

data () {

return {

count: this.num

}

},

props: {

num: {

default: 1,

type: Number

},

id: {

required: true,

type: Number

}

},

methods: {

add () {

bus.$emit('changeCount', { id: this.id, value: ++this.count });

},

sub () {

if (this.count === 1) return;

bus.$emit('changeCount', { id: this.id, value: --this.count });

},

changeCount() {

this.count = parseInt(this.count);

if (!this.count) this.count = 1;

bus.$emit('changeCount', { id: this.id, value: this.count });

}

}

}

</script>

<style lang="less" scpoed>

.number-container {

display: flex;

justify-content: center;

align-items: center;

.number-box {

width: 30px;

height: 30px;

text-align: center;

border-radius: 5px;

margin: 0 5px;

font-size: 12px;

border: 1px solid #ccc;

}

.btn-sm {

width: 30px;

}

}

</style>

注意点:

  1. 这里的数量显示原本是span元素,只能显示,不能直接修改,这里我直接改成输入框,方便直接修改数值

  2. 因为输入框的值在View侧和Model侧都会被修改到,所以要绑定v-model属性

  3. 焦点离开输入框时,需要对输入的值进行规范化,避免出现字符串,小数,留空等无法识别的值,所以在
    changeCount方法中对数据进行规范化

1
2
3
this.count = parseInt(this.count);

if (!this.count) this.count = 1;
  1. eventBus.js是Counter用于向最外层主数据传商品数量的工具,引入并定名为bus,通过bus.$emit(‘外发事件名’,
    数据)即可向外传值。这个有点像事件广播

  2. 从props中获得的数据不建议直接修改,直接修改会报警告,最好是在data中另立一个变量,通过该变量来保存和修改数据。即:

1
2
3
4
5
6
7
8
9
data () {

return {

count: this.num

}

}

五、底部组件Footer

1
2
3
4
5
6
7
8
9
10
11
12
13
14
15
16
17
18
19
20
21
22
23
24
25
26
27
28
29
30
31
32
33
34
35
36
37
38
39
40
41
42
43
44
45
46
47
48
49
50
51
52
53
54
55
56
57
58
59
60
61
62
63
64
65
66
67
68
69
70
71
72
73
74
75
76
77
78
79
80
81
82
83
84
85
86
87
88
89
90
91
92
93
94
95
96
97
98
99
100
101
102
103
104
105
106
107
108
109
110
111
112
113
114
115
116
117
118
119
120
121
122
123
124
125
126
127
128
129
130
131
132
133
134
135
136
137
138
139
<template>

<div class="footer-container">

<div class="custom-control custom-checkbox">

<input type="checkbox" class="custom-control-input" id="cbFull"
:checked="isfull" @change="fullChange" />

<label class="custom-control-label" for="cbFull">全选</label>

</div>

<div>

<span>合计:</span>

<span class="total-price">¥ {{ amount.toFixed(2) }}</span>

</div>

<button type="button" class="btn btn-primary btn-settle">结算({{
all }}</button>

</div>

</template>

<script>

export default {

props: {

isfull: {

default: true,

type: Boolean

},

amount: {

default: 0,

type: Number

},

all: {

default: 0,

type: Number

}

},

methods: {

fullChange(e) {

this.$emit('full-state', e.target.checked);

}

}

}

</script>

<style lang="less" scoped>

.footer-container {

position: fixed;

bottom: 0;

width: 100%;

height: 50px;

background-color: #fff;

border-top: 1px solid #efefef;

display: flex;

justify-content: space-between;

align-items: center;

padding: 0 10px;

font-size: 12px;

.custom-checkbox {

display: flex;

align-items: center;

#cbFull {

margin-right: 5px;

}

}

.total-price {

font-weight: bold;

font-size: 14px;

color: red;

}

.btn-settle {

height: 80%;

min-width: 110px;

font-size: 12px;

border-radius: 25px;

}

}

</style>

所有数据都是外部计算好传进来的,没有什么特别注意的地方。

六、主组件App.vue

1
2
3
4
5
6
7
8
9
10
11
12
13
14
15
16
17
18
19
20
21
22
23
24
25
26
27
28
29
30
31
32
33
34
35
36
37
38
39
40
41
42
43
44
45
46
47
48
49
50
51
52
53
54
55
56
57
58
59
60
61
62
63
64
65
66
67
68
69
70
71
72
73
74
75
76
77
78
79
80
81
82
83
84
85
86
87
88
89
90
91
92
93
94
95
96
97
98
99
100
101
102
103
104
105
106
107
108
109
110
111
112
113
114
115
116
117
118
119
120
121
122
123
124
125
126
127
128
129
130
131
132
133
134
135
136
137
138
139
140
141
142
143
144
145
146
147
148
149
150
151
152
153
154
155
156
157
158
159
160
161
162
163
164
165
166
167
168
169
170
171
<template>

<div class="app-container">

<Header title="购物车案例"></Header>

<Goods

v-for="item in list"

:key="item.id"

:id="item.id"

:title="item.goods_name"

:pic="item.goods_img"

:price="item.goods_price"

:count="item.goods_count"

:state="item.goods_state"

@state-change="getNewState"

></Goods>

<Footer :isfull="fullState" :amount="amt" :all="total"
@full-state="getNewFull"></Footer>

</div>

</template>

<script>

import axios from 'axios'

import bus from '@/components/eventBus.js'

import Header from '@/components/Header.vue'

import Goods from '@/components/Goods.vue'

import Footer from '@/components/Footer.vue'

export default {

data () {

return {

list: []

}

},

created () {

this.initCart();

bus.$on('changeCount', val => {

this.list.some(item => {

if (item.id === val.id) {

item.goods_count = val.value;

return true;

}

});

});

},

methods: {

async initCart () {

const { data: res } = await
axios.get('https://www.escook.cn/api/cart');

if (res.status === 200) {

this.list = res.list;

}

},

getNewState(val) {

this.list.some(item => {

if (item.id === val.id) {

item.goods_state = val.state;

return true;

}

});

},

getNewFull(val) {

this.list.forEach(item => item.goods_state = val);

}

},

components: {

Header, Goods, Footer

},

computed: {

fullState() {

return this.list.every(item => item.goods_state);

},

amt() {

return this.list

.filter(item => item.goods_state)

.reduce((t, item) => t += item.goods_price * item.goods_count, 0);

},

total() {

return this.list

.filter(item => item.goods_state)

.reduce((t, item) => t += item.goods_count, 0);

}

}

}

</script>

<style lang="less" scoped>

.app-container {

padding-top: 50px;

padding-bottom: 50px;

}

</style>

注意点:

  1. 通过npm i
    axios安装网络请求组件,在created的时候调用异步方法initCart来获得商品数据。

  2. 在components中挂载Header、Goods和Footer等组件

  3. Goods组件通过v-for渲染所有列表,通过自定义属性传入相关参数。

  4. 通过$on注册changeCount的监听,接收从其他地方发起的changeCount事件

  5. computed用于计算全选项,总价以及总个数

  6. 头跟底都空出50px的高度,用于放置Header和Footer组件。


本博客所有文章除特别声明外,均采用 CC BY-SA 4.0 协议 ,转载请注明出处!