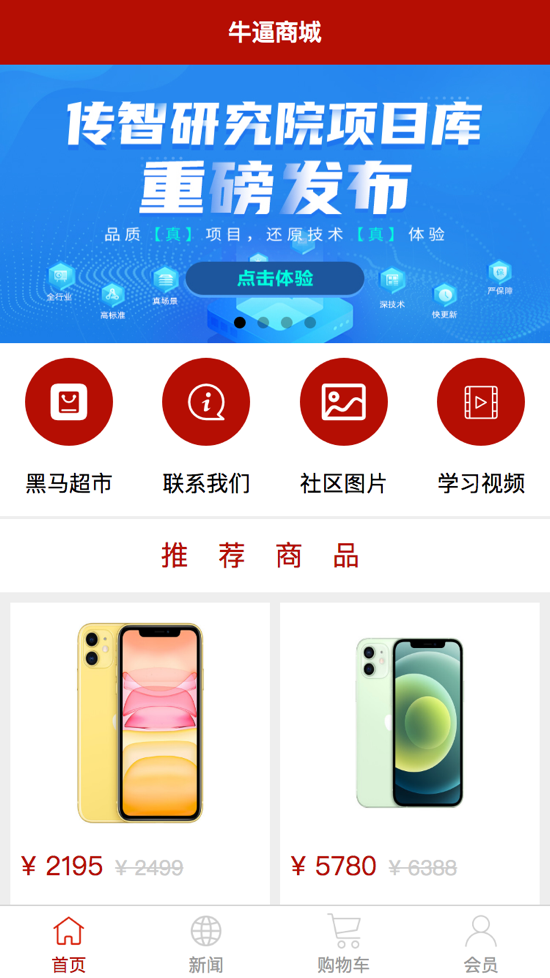
效果预览
实现顶部navbar和底部的tabbar
创建项目hm-shop
打开pages.json
配置navbair
| "globalStyle": {
"navigationBarTextStyle": "white",
"navigationBarTitleText": "黑马商城",
"navigationBarBackgroundColor": "#b50e03"
}
|
复制素材文件夹中的icon文件夹到static文件夹下面
配置tabbar
1
2
3
4
5
6
7
8
9
10
11
12
13
14
15
16
17
18
19
20
21
22
23
24
25
26
27
28
29
30
31
32
33
34
35
36
37
38
39
40
41
42
43
44
45
46
47
48
49
50
51
52
53
54
55
56
57
58
59
| "tabBar": {
"selectedColor": "#b50e03",
"backgroundColor": "#fff",
"list": [
{
"text": "首页",
"pagePath": "pages/index/index",
"iconPath": "static/icon/home.png",
"selectedIconPath": "static/icon/home-active.png"
},
{
"text": "新闻",
"pagePath": "pages/news/news",
"iconPath": "static/icon/news.png",
"selectedIconPath": "static/icon/news-active.png"
},
{
"text": "购物车",
"pagePath": "pages/cart/cart",
"iconPath": "static/icon/cart.png",
"selectedIconPath": "static/icon/cart-active.png"
},
{
"text": "会员",
"pagePath": "pages/member/member",
"iconPath": "static/icon/member.png",
"selectedIconPath": "static/icon/member-active.png"
}
]
}
|
在pages文件夹下面创建index/index.vue、news/news.vue、cart/cart.vue、member/member.vue四个页面。
在App.vue中设置全局背景颜色
1
2
3
4
5
| body {
background-color: #eee;
}
|
实现index页面
- 实现轮播图
首先轮播图需要用到组件swiper,但在实现轮播图之前,首先需要封装一个可全局使用的请求模块
- 创建utils/api.js
1
2
3
4
5
6
7
8
9
10
11
12
13
14
15
16
17
18
19
20
21
22
23
24
25
26
27
28
29
30
31
32
33
34
35
36
37
38
39
40
41
42
43
44
45
46
47
48
49
50
51
52
53
54
55
56
57
| const BASE_URL = 'http://localhost:8082';
export const myRequest = (options) => {
return new Promise((resolve, reject) => {
uni.request({
url: BASE_URL + options.url,
method: options.method || "GET",
data: options.data || {},
success: res => {
if(res.data.status !== 0) {
uni.showToast({
title: "数据加载失败!",
icon: 'error'
});
reject(res);
return;
}
resolve(res);
},
fail: err => {
uni.showToast({
title: err.errMsg,
icon: "error"
});
reject(err);
}
});
}
};
);
|
showToast是uni特有的对话框功能。
- 在main.js中注册全局函数$myRequest
1
2
3
| import { myRequest } from './utils/api.js';
Vue.prototype.$myRequest = myRequest;
|
启动vue-cms系统
获取轮播图数据
1
2
3
4
5
6
7
8
9
10
11
12
13
14
15
16
17
18
19
20
21
22
23
24
25
26
27
28
29
30
31
32
33
34
35
| export default {
data() {
return {
swipers: []
}
},
onLoad() {
this.getSwiper();
},
methods: {
async getSwiper() {
const res = await this.$myRequest({
url: "/api/getlunbo"
});
this.swipers = res.data.message;
}
}
}
|
- 实现轮播图
1
2
3
4
5
6
7
8
9
10
11
12
13
14
15
16
17
18
19
20
21
22
23
24
25
26
27
28
29
30
31
32
33
34
35
36
37
38
39
| <template>
<view class="home">
<swiper indicator-dots circular autoplay>
<swiper-item v-for="item in swipers" :key="item.id">
<image :src="item.img"/>
</swiper-item>
</swiper>
</view>
</template>
<style lang="scss" scoped>
.home {
swiper {
width: 750rpx;
height: 380rpx;
image {
height: 100%;
}
}
}
</style>
|
属性indicator-dots会在底部正中显示点点,circular会让图片到底后从头播放,autoplay则是自动播放
- 实现二级导航栏
在static文件夹中引入iconfont
在uni.scss中定义通用颜色:
- 实现导航栏
1
2
3
4
5
6
7
8
9
10
11
12
13
14
15
16
17
18
19
20
21
22
23
24
25
26
27
28
29
30
31
32
33
34
35
36
37
38
39
40
41
42
43
44
45
46
47
48
49
50
51
52
53
54
55
56
57
58
59
60
61
62
63
64
65
66
67
68
69
70
71
72
73
74
75
76
77
78
79
80
81
82
83
84
85
86
87
88
89
90
91
92
93
94
95
96
97
98
99
100
101
102
103
104
105
106
107
108
109
110
111
112
113
114
115
116
117
118
119
120
121
122
123
124
125
126
127
128
129
130
131
132
133
134
135
136
137
138
139
140
141
142
143
144
| <template>
<view class="home">
...
<view class="nav">
<view v-for="item in navList" :key="item.id"
@click="navItemClick" class="nav-item(item.path)">
<view :class="item.icon"><view>
<text>{{ item.name }}</text>
</view>
</view>
</view>
</template>
<script>
export default {
data() {
return {
navList: [
{
"name": "黑马超市",
"icon": "iconfont icon-ziyuan",
"path": "/pages/goods/goods"
},
{
"name": "联系我们",
"icon": "iconfont icon-guanyuwomen",
"path": "/pages/contact/contact"
},
{
"name": "社区图片",
"icon": "iconfont icon-tupian",
"path": "/pages/pics/pics"
},
{
"name": "学习视频",
"icon": "iconfont icon-shipin",
"path": "/pages/videos/videos"
}
]
}
},
methods: {
navItemClick(url) {
uni.navigateTo({
url
});
}
}
}
</script>
<style>
.nav {
background-color: white;
display: flex;
padding-bottom: 20rpx;
.nav-item {
width: 25%;
text-align: center;
view {
width: 120rpx;
height: 120rpx;
line-height: 120rpx;
font-size: 50rpx
border-radius: 60rpx;
color: white;
background-color: $shop-color;
margin: 10px auto;
}
text {
font-size: 30rpx;
}
}
}
</style>
|
- 实现推荐商品列表
1
2
3
4
5
6
7
| <template>
...
<view class="hot-goods">
<view class="tit">
|
推荐商品
1
2
3
4
5
6
7
8
9
10
11
12
13
14
15
16
17
18
19
20
21
22
23
24
25
26
27
28
29
30
31
32
33
34
35
36
37
38
39
40
41
42
43
44
45
46
47
48
49
50
51
52
53
54
55
56
57
58
59
60
61
62
63
64
65
66
67
68
69
70
71
72
73
74
75
76
77
78
79
80
81
82
83
84
85
86
87
88
89
90
91
92
93
94
95
96
97
98
99
100
101
102
103
104
105
106
107
108
109
110
111
112
113
114
115
116
117
118
119
120
121
122
123
124
125
126
127
128
129
130
131
132
133
134
135
136
137
138
139
140
141
142
143
144
145
146
147
148
149
150
151
152
153
154
155
156
157
158
159
160
161
162
163
164
165
166
167
168
169
| </view>
<view class="goods-list">
<view class="goods-item" v-for="item in goods" :key="item.id">
<image src="item.img_url"/>
<view class="price">
<text>¥{{ item.sell_price }}</text>
<text>¥{{ item.market_price }}</text>
</view>
<view class="name">
{{ item.title }}
</view>
</view>
</view>
</view>
</template>
<script>
export default {
data() {
return {
goods: []
}
},
onLoad() {
this.getGoods();
},
methods: {
async getGoods() {
const res = await this.$myRequest({
url: '/api/getgoods'
});
this.goods = res.data.message;
}
}
}
</script>
<style lang="scss" scoped>
.hot-goods {
.tit {
background-color: white;
margin: 4rpx 0;
color: $shop-color;
text-align: center;
letter-spacing: 40rpx;
height: 100rpx;
line-height: 100rpx;
font-size: 38rpx;
}
.goods-list {
padding: 0 15rpx;
display: flex;
justify-content: space-between;
flex-wrap: wrap;
.goods-item {
margin: 10rpx 0;
width: 355rpx;
padding: 15rpx;
background-color: white;
box-sizing: border-box;
image {
width: 80%;
height: 300rpx;
display: block;
margin: auto;
}
.price {
margin: 20rpx 0 10rpx 0;
font-size: 36rpx
color: $shop-color;
text: nth-child(2) {
font-size: 28rpx;
color: #ccc;
text-decoration: line-through;
margin-left: 17rpx;
}
}
.name {
font-size: 32rpx;
line-height: 50rpx;
padding-bottom: 15rpx;
padding-top: 10rpx;
}
}
}
}
</style>
|
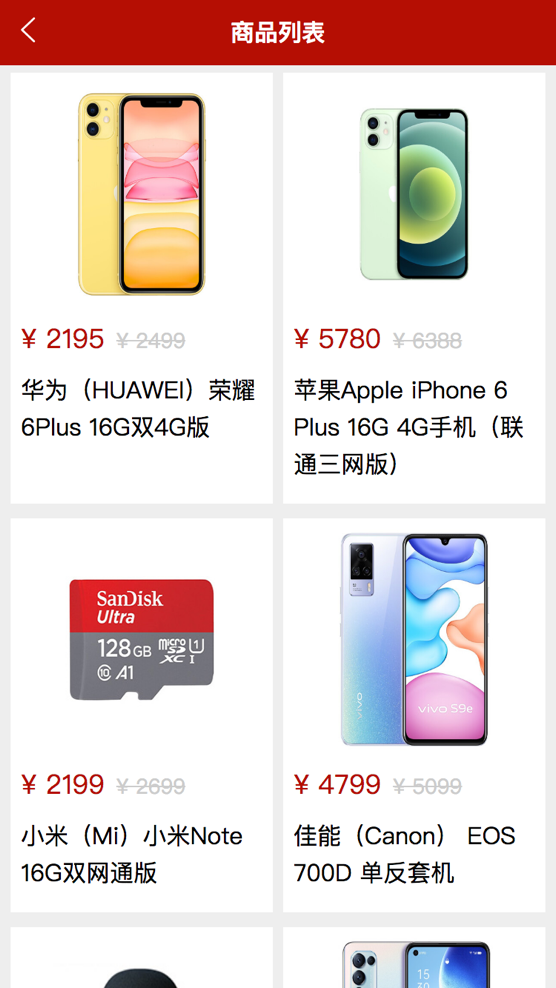
实现商品列表页面
- 创建components/good-list.vue
1
2
3
4
5
6
7
8
9
10
11
12
13
14
15
16
17
18
19
20
21
22
23
24
25
26
27
28
29
30
31
32
33
34
35
36
37
| <template>
<view class="goods-list">
<view class="goods-item" v-for="item in goods" :key="item.id">
<image src="item.img_url"/>
<view class="price">
<text>¥{{ item.sell_price }}</text>
<text>¥{{ item.market_price }}</text>
</view>
<view class="name">
{{ item.title }}
</view>
</view>
</view>
</template>
<script>
export default {
props: ['goods']
}
</script>
|
- 创建页面goods.vue:
1
2
3
4
5
6
7
8
9
10
11
12
13
14
15
16
17
18
19
20
21
22
23
24
25
26
27
28
29
30
31
32
33
34
35
36
37
38
39
40
41
42
43
44
45
46
47
48
49
50
51
| <template>
<view>
<good-list :goods="goods" />
</view>
</template>
<script>
import goodList from '../../components/good-list.vue';
export default {
components: {
'good-list': goodList
},
data() {
return {
goods: []
}
},
methods: {
async getGoods() {
const res = await this.$myRequest({
url: '/api/getgoods'
});
this.goods = res.data.message;
},
}
}
</script>
|
- 上拉下拉刷新
在pages.json中开启下拉刷新
实现上拉下拉刷新
1
2
3
4
5
6
7
8
9
10
11
12
13
14
15
16
17
18
19
20
21
22
23
24
25
26
27
28
29
30
31
32
33
34
35
36
37
38
39
40
41
42
43
44
45
46
47
48
49
50
51
52
53
54
55
56
57
58
59
60
61
62
63
64
65
66
67
68
69
70
71
72
73
74
75
76
77
78
79
80
81
82
83
| <template>
...
<view v-if="reachBottom
">--------我是有底线的------</view>
</template>
<script>
export default {
data() {
return {
index: 1,
goods: [],
reachBottom: false
}
},
onLoad() {
this.getGoods();
},
methods: {
async getGoods() {
const res = await this.$myRequest({
url: '/api/getgoods?pageindex=' + this.index
});
this.goods = [...this.goods, ...res.data.message];
}
},
onPullDownRefresh() {
this.index = 1;
this.goods = [];
this.reachBottom = false;
setTimeout(() => {
this.getGoods().then((resolve) => {
uni.stopPullDownRefresh();
});
}, 1000);
},
onReachBottom() {
if(this.goods.length < this.pageindex * 10) return reachBottom =
true;
this.index ++;
this.getGoods();
}
}
</script>
|
下拉刷新时,直接清空goods列表,重新加载数据
通过传入匿名函数,在getGoods函数中执行该回调函数,停止下拉刷新。
触底时如果商品总个数小于页面总个数,那就说明触底了,不需要再刷新。不过这种判断方法有问题,一旦个数刚好是十个,就会跳过这个判断条件。
最后的方式请求新的pageindex,如果返回的数据为空,就显示底线。
async函数返回的是一个Promise
实现商品详情页面
- 在good-list中增加跳转逻辑
1
2
3
4
5
6
7
8
9
10
11
12
13
14
15
16
17
18
19
20
21
| <view class="goods-item" ... @click="navigator(item.id)">
...
</view>
<script>
...
methods: {
navigator(id) {
this.$emit('itemClick', id);
}
}
</script>
|
- 在父组件中调用跳转逻辑
1
2
3
4
5
6
7
8
9
10
11
12
13
14
15
16
17
18
19
20
21
| <good-list ... @itemClick="goDetail" />
<script>
...
methods: {
goDetail(id) {
uni.navigateTo({
url: '/pages/good-detail/good-detail?id=' + id
});
}
}
</script>
|
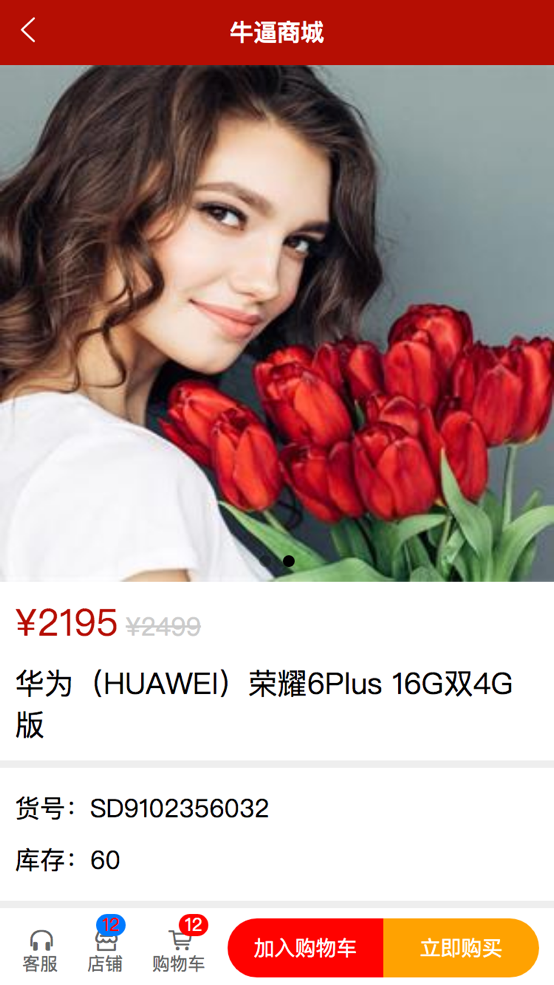
- 实现详情页
1
2
3
4
5
6
7
8
9
10
11
12
13
14
15
16
17
18
19
20
21
22
23
24
25
26
27
28
29
30
31
32
33
34
35
36
37
38
39
40
41
42
43
44
45
46
47
48
49
50
51
52
53
54
55
56
57
58
59
60
61
62
63
64
65
66
67
68
69
70
71
72
73
74
75
76
77
78
79
80
81
82
83
84
85
86
87
88
89
90
91
92
93
94
95
96
97
98
99
100
101
102
103
104
105
106
107
108
109
110
111
112
113
114
115
116
117
118
119
120
121
122
123
124
125
126
127
128
129
130
131
132
133
134
135
136
137
138
139
140
141
142
143
144
145
146
147
148
149
150
151
152
153
154
155
156
157
158
159
160
161
162
163
164
165
166
167
168
169
170
171
172
173
174
175
176
177
178
179
180
181
182
183
184
185
186
187
188
189
190
191
192
193
194
195
196
197
198
199
200
201
202
203
204
205
206
207
208
209
210
211
212
213
214
215
216
217
218
219
220
221
222
223
224
225
226
227
228
229
230
231
232
233
234
235
236
237
238
239
240
241
242
243
244
| <template>
<view class="detail">
<view class="main">
<swiper>
<swiper-item v-for="item in swipers" :key="item.id">
<image :src="item.src" />
</swiper-item>
</swiper>
<view class="price">
<text class="sell">¥{{ goodInfos.sell_price }}</text>
<text class="market">¥{{ goodInfos.market_price }}</text>
</view>
<view class="tit">
{{ goodInfos.title }}
</view>
<view class="info">
<view>货号:{{ goodInfos.goods_no }}</view>
<view>库存:{{ goodInfos.stock_quantity }}</view>
</view>
<view class="content">
<view>详细介绍</view>
<rich-text :nodes="desc.content"
@itemClick="previewImg"></rich-text>
<view>
</view>
</view>
</template>
<script>
export default {
data() {
return {
id: 0,
swipers: [],
goodInfos: {},
desc: {}
}
},
onLoad(options) {
this.id = options.id;
this.getSwipers();
this.getGoodInfos();
this.getDesc();
}
methods: {
async getSwipers() {
const res = await this.$myRequest({
url: '/api/getthumimages/' + this.id
});
this.swipers = res.data.message;
},
async getGoodInfos() {
const res = await this.$myRequest({
url: '/api/goods/getinfo/' + this.id
});
this.goodInfos = res.data.message[0];
},
async getDesc() {
const res = await this.$myRequest({
url: '/api/goods/desc/' + this.id
});
this.desc = res.data.message[0];
},
previewImg(e) {
let current = e.detail.node.attes.desc;
uni.previewImage({
current,
urls: [current]
});
}
}
}
</script>
<style lang="scss" scoped>
.detail {
main {
swiper {
height: 700rpx;
image {
width: 100%;
height: 100%;
}
}
.price {
background-color: white;
color: $shop-color;
font-size: 40rpx;
padding: 20rpx;
text:nth-child(2) {
color: #ccc;
text-decoration: line-through;
font-size: 32rpx;
margin-left: 5rpx;
}
}
.tit {
background-color: white;
font-size: 60rpx;
padding: 20rpx
}
.info {
padding: 20rpx;
font-size: 40rpx;
line-height: 40rpx;
margin-top: 10rpx;
}
.content {
margin-top: 10rpx;
view {
font-size: 50rpx;
padding: 20rpx;
border-bottom: 1px solid #ccc;
}
rich-text {
text-align: justify;
padding: 20rpx;
img {
width: 720rpx
}
}
}
}
}
</style>
|
- 实现底部控件
从插件市场引入uni-goods-nav
在good-list页面中引入uni-goods-nav组件:
1
2
3
4
5
6
7
8
9
10
11
12
13
14
15
16
17
18
19
20
21
22
23
24
25
26
27
28
29
30
31
32
33
34
35
36
37
38
39
40
41
42
43
44
45
46
47
48
49
50
51
52
53
54
55
56
57
58
59
60
61
62
63
64
65
66
67
68
69
70
71
72
73
74
75
76
77
78
79
80
81
82
83
84
85
86
87
88
89
90
91
92
93
94
95
96
97
98
99
100
101
102
103
104
105
106
107
108
109
110
111
| <template>
...
<uni-goods-nav :fill="true" :options="options"
:buttonGroup="buttonGroup" @click="onClick"
@buttonClick="buttonClick" />
</template>
<script>
export default {
data() {
return {
options: [
{
icon: "headphones",
text: "客服"
},
{
icon: "shop",
text: "店铺",
info: 12,
infoBackgroundColor: '#007aff',
infoColor: 'red'
},
{
icon: "cart",
text: "购物车",
info: 12
}
],
buttonGroup: [
{
text: "加入购物车",
backgroundColor: "#ff0000",
color: "#fff"
},
{
text: "立即购买",
backgroundColor: '#ffa200',
color: "#fff"
}
]
}
},
methods: {
onClick(e) {
uni.showToast({
title: `点击${ e.content.text }`,
icon: 'none'
});
},
buttonClick(e) {
console.log(e);
this.options[2].info ++;
}
}
}
</script>
|
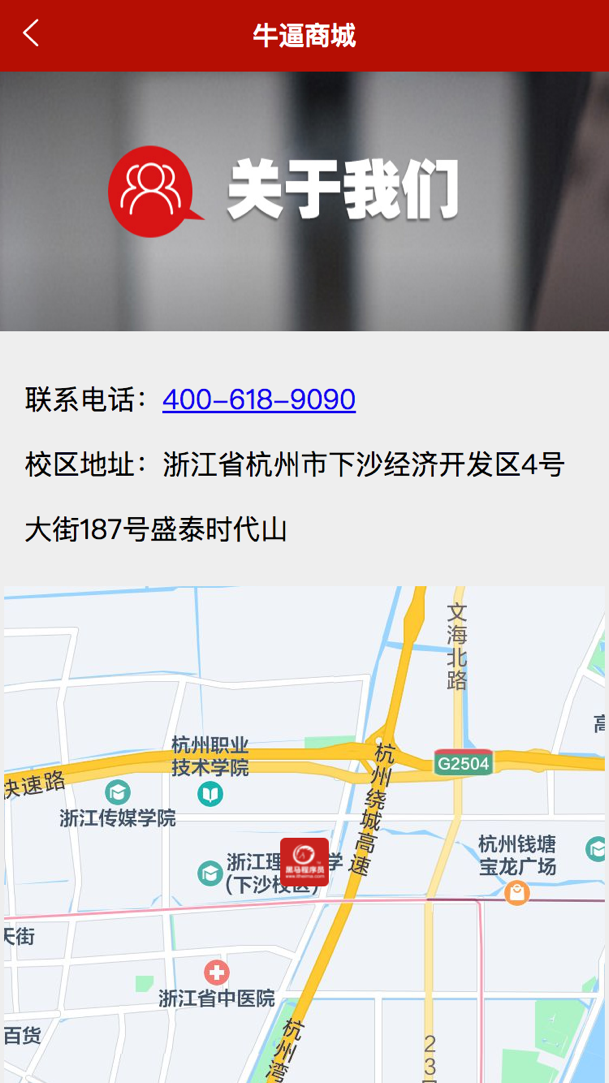
实现联系我们页面
在小程序中使用腾讯地图不需要key,但在网页中使用则需要在官方网站申请key,然后把申请到的key填入manifest.json->h5配置->定位和地图中
复制logo到static文件夹下面。
实现代码:
1
2
3
4
5
6
7
8
9
10
11
12
13
14
15
16
17
18
19
20
21
22
23
24
25
26
27
28
29
30
31
32
33
34
35
36
37
38
39
40
41
42
43
44
45
46
47
48
49
50
51
52
53
54
55
56
57
58
59
60
61
62
63
64
65
66
67
68
69
70
71
72
73
74
75
76
77
78
79
80
81
82
83
84
85
86
87
88
89
90
91
92
93
94
95
96
97
98
99
100
101
102
103
104
105
106
107
108
109
110
111
112
113
114
115
116
| <template>
<view class="contact">
<img src="https://www.itcast.cn/2018czydz/images/gywmban.jpg" />
<view class="info">
<view class="phone">联系电话:<a href="#"
@click.prevent="callphone">{{ phoneNumber }}</a></view>
<view
class="address">校区地址:浙江省杭州市下沙经济开发区4号大街187号盛泰时代山</view>
</view>
<map :longitude="longitude" :latitude="latitude" :scale="scale"
:makers="makers"></map>
</view>
</template>
<script>
export default {
data() {
return {
phoneNumber: "400-618-9090",
longitude: 120.363172,
latitude: 30.312212,
scale: 13,
markers: [
{
longitube: 120.363172,
latitude: 30.312212,
iconPath: "../../static/hmlogo.png",
width: 30,
height: 30
}
]
}
},
methods: {
callphone() {
uni.makePhoneCall({
phoneNumber: this.phoneNumber
});
}
}
}
</script>
<style lang="scss" scoped>
.contact {
background-color: white;
img {
width: 750rpx;
height: 320rpx
}
.info {
margin: 30rpx;
line-height: 80rpx;
font-size: 34rpx;
}
map {
width: 740rpx;
height: 740rpx;
margin: 0 auto;
}
}
</style>
|
实现社区图片页面
创建pics/pics.vue:
1
2
3
4
5
6
7
8
9
10
11
12
13
14
15
16
17
18
19
20
21
22
23
24
25
26
27
28
29
30
31
32
33
34
35
36
37
38
39
40
41
42
43
44
45
46
47
48
49
50
51
52
53
54
55
56
57
58
59
60
61
62
63
64
65
66
67
68
69
70
71
72
73
74
75
76
77
78
79
80
81
82
83
84
85
86
87
88
89
90
91
92
93
94
95
96
97
98
99
100
101
102
103
104
105
106
107
108
109
110
111
112
113
114
115
116
117
118
119
120
121
122
123
124
125
126
127
128
129
130
131
132
133
134
135
136
137
138
139
140
141
142
143
144
145
146
147
148
149
150
151
152
153
154
155
156
157
158
159
160
161
162
163
164
165
166
167
168
169
170
171
172
173
174
175
176
177
| <template>
<view class="pics">
<scroll-view scroll-y class="left">
<view v-for="(item, index) in cates" :key="item.id" :class="active
=== index ? 'active' : '' " @click="leftHandler(index,
item.id)">
{{ item.title }}
</view>
</scroll-view>
<scroll-view class="right">
<view class="item" v-for="item in secondData" :key="item.id">
<img :src="item.img_url" @click="previewImg(item.img_url)" />
<text>{{ item.title }}</text>
</view>
<view v-if="secondData.length === 0">暂无数据</view>
</scroll-view>
</view>
</template>
<script>
export default {
data() {
return {
cates: [],
active: 0,
secondData: []
}
}
methods: {
async getCategory() {
const res = await this.$myRequest({
url: '/api/getimgcategory'
});
this.cates = res.data.message;
},
async leftHandler(index, id) {
this.active = index;
const res = await this.$myRequest({
url: '/api/getimage/' + id
});
this.secondData = res.data.message;
},
previewImg(current) {
const urls = this.secondData.map(item =>{
return item.img_url;
})
uni.previewImg({
current,
urls
})
}
}
}
</script>
<style>
.pics {
background-color: white;
display: flex;
.left {
border-right: 1px solid #eee;
width: 200rpx
view {
font-size: 30rpx;
line-height: 120rpx;
height: 120rpx;
border-top: 1px solid #ccc;
text-align: center;
color: #333;
}
.active {
background-color: $shop-color;
color: white;
}
}
.right {
width: 550rpx;
margin: 0 auto;
.item {
img {
width: 520rpx;
height: 520rpx;
border-radius: 5rpx;
}
text {
font-size: 30rpx;
line-height: 60rpx;
}
}
}
}
</style>
|
实现新闻页面
在main.js中实现全局过滤器formatDate:
1
2
3
4
5
6
7
8
9
10
11
12
13
| Vue.filter('formatDate', (date) => {
const nDate = new Date(date);
const year = nDate.getFullYear();
const month = nDate.getMonth().toString().padStart(2, 0);
const day = nDate.getDay().toString().padStart(2, 0);
return `${year}-${month}-${day}`;
});
|
示例代码:
1
2
3
4
5
6
7
8
9
10
11
12
13
14
15
16
17
18
19
20
21
22
23
24
25
26
27
28
29
30
31
32
33
34
35
36
37
38
39
40
41
42
43
44
45
46
47
48
49
50
51
52
53
54
55
56
57
58
59
60
61
62
63
64
65
66
67
68
69
70
71
72
73
74
75
76
77
78
79
80
81
82
83
84
85
86
87
88
89
90
91
92
93
94
95
96
97
98
99
100
101
102
103
104
105
106
107
108
109
110
111
112
113
114
115
116
117
118
119
120
121
122
123
124
125
126
127
128
129
130
131
132
133
134
135
136
137
| <template>
<view class="news">
<view v-for="item in newList" :key="item.id"
@click="goDetail(item.id)" class="new-item" />
<img :src="item.img_url"/>
<view class="right">
<view class="tit">{{ item.title }}</view>
<view class="info">
<view class="time">发表时间:{{ item.add_time | formatDate
}}</view>
<view class="click">浏览:{{ item.click }}</view>
</view>
</view>
</view>
</view>
</template>
<script>
export default {
data() {
return {
newList: []
}
},
onLoad() {
this.getNews();
},
methods: {
async getNews() {
const res = await this.$myRequest({
url: '/api/getnewslist'
});
this.newList = res.data.message;
},
goDetail(id) {
uni.navigateTo({
url: '/pages/news-detail/news-detail?id=' + id
})
}
}
}
</script>
<style lang="scss" scoped>
.news {
background-color: white;
.new-item {
display: flex;
justify-content: space-between;
padding: 10rpx 20rpx
border-bottom: 1px solid $shop-color;
img {
width: 200rpx;
height: 150rpx;
}
.right {
display: flex;
flex-direction: column;
justify-content: space-between;
margin-left: 15rpx;
.tit {
font-size: 30rpx;
}
.info {
display: flex;
justify-content: space-between;
font-size: 24rpx;
}
}
}
}
</style>
|
实现新闻详情页面
示例代码:
1
2
3
4
5
6
7
8
9
10
11
12
13
14
15
16
17
18
19
20
21
22
23
24
25
26
27
28
29
30
31
32
33
34
35
36
37
38
39
40
41
42
43
44
45
46
47
48
49
50
51
52
53
54
55
56
57
58
59
60
61
62
63
64
65
66
67
68
69
70
71
72
73
74
75
76
77
78
79
80
81
82
83
84
85
86
87
88
89
90
91
92
93
94
95
96
97
98
99
100
101
102
103
104
105
106
| <template>
<view class="news-detail">
<view class="tit">{{ content.title }}</view>
<view class="info">
<view class="time">发表时间:{{ content.add_time | formatDate
}}</view>
<view class="click">浏览:{{ content.click }}</view>
</view>
<rich-text class="content" :nodes="content.content"></rich-text>
</view>
</template>
<script>
export default {
data() {
return {
id: 0,
content: {}
}
},
onLoad(options) {
this.id = options.id;
this.getNew();
},
methods: {
async getNew() {
const res = await this.$myRequest({
url: '/api/getnew/' + this.id
});
this.content = res.data.message[0];
}
}
}
</script>
<style>
.tit {
font-size: 46rpx;
text-align: center;
width: 750rpx;
padding: 10rpx 0;
font-weight: bold;
}
.info {
font-size: 26rpx;
display: flex;
justify-content: space-between;
padding: 10rpx 20rpx;
}
.content {
margin: 20rpx 20rpx;
display: block; // rich-text是行内元素
font-size: 36rpx;
text-align: justify;
}
</style>
|
参考:
28-项目功能介绍
29-创建项目和清理结构及配置基本外观
30-完成底部tabbar的配置
31-获取轮播图的数据
32-封装$myRequest方法并挂在全局
33-完成首页轮播图的渲染
34-实现导航的基本结构
35-完成商品推荐结构
36-完成推荐商品数据渲染
37-改造导航区域并跳转到商品列表页面
38-封装商品列表组件并使用
39-实现上拉加载更多和下拉刷新
40-完成联系我们页面的地图和拨打电话
41-实现社区图片左侧的结构和样式
42-实现左侧数据渲染和点击高亮
43-实现右侧数据的渲染
44-实现图片的预览功能
45-实现资讯列表的结构和数据的获取
46-实现news-item组件的封装
47-实现列表跳转详情并传递id
48-完成资讯详情页面
49-点击商品列表导航至商品详情页
50-实现商品详情轮播图
51-实现详情其他部分的结构
52-实现详情页面的数据渲染
53-利用uni-ui实现底部导航区域